> ## Documentation Index
> Fetch the complete documentation index at: https://developer.voyado.com/llms.txt
> Use this file to discover all available pages before exploring further.
# Points
In Engage, contacts can earn points when they make purchases, or be granted them for events such as when it's their birthday or when they sign up. Those points can then be converted to vouchers.
* A **points model** must be configured in your Engage installation, in the **Rewards** module, for points to be available. Contact your Voyado AM about this.
* On the **contact card** under the tab "Reward points" in the Engage UI, you can see all points gained by a contact.
* All **points changes** done over the API use the `v3/point-accounts` endpoints, which are discussed below.
Several changes were made in the various points endpoints when moving to the v3 API. [See the full list here](/docs/api/api-changes-v3). An important change is that in v3 a contact's total points are no longer returned from **/contactoverview**. This can now only be done through a separate GET request to the already existing but slightly changed **/point-accounts** endpoint. See details below.
## Terms and parameters
Here are some important parameters and terms when working with points:
**Point definitions:** The "type" of points. Currently one point definition exists but the system allows for different kinds of points to be tracked in parallel, each with their own point definition value. The parameter used to tell point definitions apart is `definitionId`.
**Point accounts:** Points of different types are separated by their point definition value. This allows contacts to have many independent point totals and histories (accounts) each uniquely defined by a specific contact ID and a specific definition ID. The parameter for a point account is `accountId`.
**Point transactions**: A transaction or an update to a transaction that specifies the changes to a contact's points.
**Active points:** The points that a contact currently owns which can be used to create vouchers.
**Pending points:** Points with a `validFrom` date in the future, which means they will not become active points until then.
**Pagination in responses:** Done with the optional `offset` and `count` parameters.
**Filter active or pending:** The `filter` parameter which can be "All", "Active", "Pending" (or blank) returns active points, pending points, or both.
## Get all point accounts
To get all of a customer's point accounts, use this endpoint:
```http theme={null}
GET api/v3/point-accounts
```
Send the customer's `contactId` as a query string parameter. This returns all of their point accounts in this form:
```json theme={null}
{
"links": [],
"count": 2,
"offset": 0,
"items": [
{
"balance": 110,
"balanceExpires": "2023-08-14T13:03:52.0510384+02:00",
"contactId": "efaaefb8-e07a-46d5-89fa-1423e87b0798123111",
"definitionId": 1,
"id": 9,
"pendingPoints": 0,
"pointsWillExpireDueToInactivity": "2024-06-02T10:53:04.5084821+02:00",
"links": [
{
"id": 1,
"href": "https://yoururl/api/v3/point-accounts/definitions/1",
"method": "GET",
"rel": "definition"
},
{
"href": "https://yoururl/api/v3/point-accounts/transactions?accountId=9",
"method": "GET",
"rel": "transactions"
}
]
},
{
"balance": 110,
"balanceExpires": "2023-08-14T13:03:52.0510384+02:00",
"contactId": "efaaefb8-e07a-46d5-89fa-1423e87b0798123111",
"definitionId": 2,
"id": 9,
"pendingPoints": 0,
"pointsWillExpireDueToInactivity": "2024-06-02T10:53:04.5084821+02:00",
"links": [
{
"id": 1,
"href": "https://yoururl/api/v3/point-accounts/definitions/1",
"method": "GET",
"rel": "definition"
},
{
"href": "https://yoururl/api/v3/point-accounts/transactions?accountId=9",
"method": "GET",
"rel": "transactions"
}
]
}
],
"totalCount": 2
}
```
The `pointsWillExpireDueToInactivity` value indicates the point in time when transactions will expire due to the expiry method "Contact inactive", and is only applicable for this expiry method.
## Get specific point account
If you know the unique ID of the point account, you can get the data for that account directly by using its ID in the path as shown here:
```http theme={null}
GET api/v3/point-accounts/fa1de1de-427d-4a63-8f43-513fc8b5e97b
```
This returns the following structure:
```json theme={null}
{
"balance": 110,
"balanceExpires": "2023-08-14T13:03:51.9719335+02:00",
"contactId": "af687249-b52a-4926-8591-ccf881b59e9e",
"definitionId": 1,
"id": 1234567899,
"pendingPoints": 0,
"pointsWillExpireDueToInactivity": "2024-06-02T10:53:04.5084821+02:00",
"links": [
{
"id": 1,
"href": "https://yoururl/api/v3/point-accounts/definitions/1",
"method": "GET",
"rel": "definition"
},
{
"href": "https://yoururl/api/v3/point-accounts/transactions?accountId=9",
"method": "GET",
"rel": "transactions"
}
]
}
```
The `links` array contains optional information with some useful API calls you can use.
The `balanceExpires` field indicates a point in time when the balance may change due to activation or expiration of points. However, because it depends on multiple factors, its behavior can be unpredictable. Therefore, we don't recommend relying on this field.
## Get transactions for point account
The point account ID is unique for every point account in the database. Once you have that, you can get the detailed transactions for that particular point account, showing all occasions when points have been generated, removed or adjusted:
```http theme={null}
GET /api/v3/point-accounts/{accountId}
```
This returns a response of this form:
```json theme={null}
{
"Items": [
{
"id": "861e728a-7037-4dc9-9907-5b38691a9c8e",
"accountId": "33aac83b-a50c-1234-b57f-5b94b9f1a1a2",
"description": "Test",
"source": "Automation",
"amount": 100,
"type": "Addition",
"transactionDate": "2024-09-20T11:51:29.408622+00:00",
"createdOn": "2024-09-20T11:51:29.408622+00:00",
"modifiedOn": "2024-09-20T11:51:29.408622+00:00",
"validFrom": "2024-09-15T11:51:29.408622+00:00",
"validTo": "2024-09-25T11:51:29.408622+00:00",
"retailTransactionLineItemId": "5a3f4a1f-5f30-42c6-a333-dcaa68b3f09f"
}
],
"totalCount": 1,
"offset": 0,
"count": 1,
"links": [
...
]
}
```
Every transaction (points change) for this account is an entry in the `items` array.
The value of `type` can be "Addition", "Deduction", "Expiry" or "Cancellation".
There are some optional parameters you can use to filter which results you get back:
* The parameters `offset` and `count` can be used to paginate the results
* The parameter `filter` can be used to fetch active points, pending points or both
* The parameter `sortBy` lets you sort the results on transaction date or created-on date
* With `sortOrder` you can order results in ascending or descending order
For example. this request returns all **pending points** transactions for this point account ID:
```http theme={null}
GET api/v3/point-transactions?id=55579bfd-718a-496e-bd80-50e5ec5b0d2b145&filter=pending
```
### Point transactions descriptions
In the payload returned from /point-transactions you'll see a "description" field. This functionality has changed somewhat in API v3.
```json theme={null}
{
"items": [
{
"id": "be5abf92-98ac-4192-b0c3-af7da42fbb5a",
"accountId": "1096a160-af33-4f4f-b78a-5ddc284451af",
"description": "@@(Bonus.Points) - Slim Fit T-shirt",
"source": "Purchase",
"amount": 719.7,
"type": "Addition",
...
},
{
"id": "12548f57-fbdf-1234-8b14-de9e30ce5e3a",
"accountId": "2222a160-af60-4f4f-b78a-5ddc284451af",
"description": "@@(ConvertedToBonusCheck)",
"source": "RewardVoucher",
"amount": -15000,
"type": "Deduction",
...
},
{
"id": "f5d27525-918c-4fb2-a71e-c90f5efbff09",
"accountId": "7777a160-af60-4f4f-b78a-5ddc284451af",
"description": "Plus member - extra points for purchase (45 points) - Regular Fit Sweatshirt",
"source": "BonusPromotion",
"amount": 449.85,
"type": "Addition",
...
}
],
"totalCount": 2,
"offset": 0,
"count": 2,
"links": []
}
```
In the above example, you'll see that some `description` values contain a code, such as @@(ConvertedToBonusCheck). These codes are *placeholders for a certain type of description* and for each one you can configure a custom text to explain the transaction. for example, on a contact's My Pages.
Here are explanations along with suggested descriptions:
| Code | Usage | Example description |
| ------------------------------ | ---------------------------------------------------------------------- | ------------------------------- |
| @@(Bonus.Points) | When points are awarded for a purchase. | "Points awarded from purchase." |
| @@(RemovedDueToTimeLimit) | When points have passed their expiry date and can no longer be used. | "Deduction for expired points." |
| @@(Bonus.DeductionForDiscount) | When points are removed because of the price being discounted. | "Deduction for discount." |
| @@(Bonus.DeductionForReturn) | When points are removed because of a return being made. | "Deduction for returned item." |
| @@(ConvertedToBonusCheck) | When points are removed because they have been converted to a voucher. | "Points converted to voucher." |
You will need to handle this manually in your frontend, using either the texts suggested in the table, or your own customized version of them, whichever suit your needs.
## Add single point transaction
This is the recommended way to add a single points transaction to a points account.
```http theme={null}
POST /api/v3/point-transactions
```
To add multiple points transactions at once, to the same or to different point accounts, you can use the bulk endpoint `/api/v3/point-accounts/transactions` which is covered in the following section.
The data sent in the request body has the following structure:
```json Adding a single transaction theme={null}
{
"accountId": "00000000-0000-0000-0000-000000000000",
"transactionId": "00000000-0000-0000-0000-000000000000",
"transactionType": "Addition",
"amount": 0,
"description": "string",
"source": "Automation",
"transactionDate": "2024-11-13T08:16:27.949Z",
"validFrom": "2024-11-13T08:16:27.949Z",
"validTo": "2024-11-13T08:16:27.949Z"
}
```
The account ID for the account you'll be adding the transaction to.
If this transaction is coming from, for example, your e-com, then there is already a unique ID that you can use. Or you can create one and store it your own database as a reference.
If the settings for expiration are correctly set up AND the value of `validTo` or `expireAfterMonthsInactive` matches that expiration setting, these fields can both be set to blank and values will be added based on the expiration settings.
## Add several point transactions
To batch-add point transactions to Engage, or adjust existing points, use this endpoint.
```http theme={null}
POST api/v3/point-accounts/transactions
```
The transaction data is sent in the request body, in this JSON format:
```json Adding several transactions at once theme={null}
[
{
"contactId": "111111fa6-103b-459b-8d01-b6c000e8e26a",
"amount": 12,
"definitionId": 1,
"timeStamp": "2023-06-01T08:40:51.658Z",
"source": "Purchase",
"description": "Gilded gauntlets",
"validFrom": "2023-06-16T08:40:51.658Z",
"validTo": "2024-06-16T08:40:51.658Z"
},
...
]
```
Many transactions can be sent in this array, up to a maximum of 1000.
The points amount (12 in this case) will be added to the point account defined by this contact ID and definition ID. If no point account exists for that contact ID and definition ID, then one will be created and used.
Common values for `source` are "Purchase", "Adjustment" and "Return". Other values are also available.
Since the points in this example have a `validFrom` date that's in the future from the purchase date, these points will be pending until then. When that date arrives, they will change to active.
A successful POST to this endpoint gets a *HTTP 202 Accepted response*.
Otherwise you'll get: *HTTP 400 Too many items, New point system not active*.
## Get a specific transaction
You can fetch the information for a specific point transaction if your know its unique transaction ID:
```http theme={null}
GET api/v3/point-transactions/{transactionId}
```
This returns the transaction with that ID (assuming it exists) in the following format:
```json Transaction data exmaple theme={null}
{
"accountId": 1,
"amount": 800,
"createdOn": "2022-11-16T13:17:54+00:00",
"description": "Some text",
"id": 1,
"modifiedOn": "2022-12-16T00:05:21+00:00",
"source": "Adjustment",
"transactionDate": "2022-11-16T14:17:54+01:00",
"type": "Adjustment",
"validFrom": "2016-11-16T14:17:54+01:00",
"validTo": "2017-11-16T23:59:59+01:00",
"retailTransactionLineItemId": "d5ad8be8-6785-4922-95fe-b12500d3ff91"
"links": [
...
]
}
```
The value of `retailTransactionLineItemId` allows you to link this particular point transaction back to the exact line item that caused it.
## Pending points
Pending points are an Engage feature powered by the latest version of points. They can be seen as points that are granted but that only become "real" after a configurable delay.
* **Active:** Points with no `validFrom` date or one that is in the past (regular points, basically)
* **Pending:** Points with a `validFrom` date in the future, after which they become active
Pending points can fetched via the points API. How this is done depends on whether you want the total number of points (the balance) or the detailed transactions showing each change for that point account.
### Fetch pending point balance
To get the point account balances for a customer, you use the following endpoint, sending in the query string the `contactId` of the contact you are interested in.
```http theme={null}
GET api/v3/point-accounts
```
In the response you'll get the point account information and balance, with `pendingPoints` as one of the values.
### Fetch pending point transactions
To get the pending point transactions for a customer, make a request with the point account ID (as `id`) in the query string to this endpoint.
```http theme={null}
GET api/v3/point-transactions
```
To get only pending points transactions, use the optional parameter `filter` in the query string with the value of "Pending".
### Create pending points
Points can also be created as pending for one or more contacts when added through this endpoint:
```http theme={null}
POST /api/v3/point-accounts/transactions
```
This is done by passing the `validFrom` parameter along with the other information required in the body of the request. Set `validFrom` it to the date in the future from which these points will change from pending to active, and now you have created pending points. Example:
```json Adding pending points example theme={null}
[
{
"contactId": "00000000-0000-0000-0000-000000000000",
"amount": 0,
"definitionId": 0,
"timeStamp": "2024-09-26T08:01:19.710Z",
"source": "string",
"description": "string",
"validFrom": "2025-09-26T08:01:19.710Z",
"validTo": "2025-11-26T08:01:19.710Z"
}
]
```
### Add points manually
The `validFrom` parameter is not used for points which are added manually or via automations. Points created in one of these ways will always be active immediately.
When you activate pending points, a contact's already existing points will not be affected. Only points created *after* the activation will be able to use the pending points function.
## Webhooks
Engage provides webhooks for working with points and vouchers.
## Point follower
Sometimes a customer wants to be the *point master* (that is, to own and calculate their end-user's points in their own system). But they might still want to use Engage's functionality for visualizing and adding points based on non-purchase events like engagements, birthday, reviews or whatever.
In this case, Engage can be configured to be the *point follower*. Engage and the point master system must then sync points with each other, with the point master being the single source of truth.
Point follower, on a functional level, means that Engage stops generating points from purchases. This means also means that point based member levels, extra point on purchase and generation of reward vouchers doesn't work.
Engage receives the current point balances for a contact from the point master system and sets the total in Engage to this value. Not that there will be no information sent about why the balance changed.
The current Engage-as-point-follower solution uses a combination of API endpoints and webhooks.
There are three parts to the solution:
* The point master sends balance-only updates via the Engage API
* Engage imports the points log from an external API provided by the point master
* Engage exports point adjustments to the point master via a webhook
Expand the sections below to see each stage in detail.
The point master needs to regularly send points updates to Engage so that both systems remain in sync. This is done using this Engage API endpoint:
```http theme={null}
POST /api/v3/point-accounts/balances
```
The payload has the following form:
```json Payload to sync points accounts theme={null}
[
{
"contactId": "00000000-0000-0000-0000-000000000001",
"amount": 122,
"definitionId": 1,
"timeStamp": "2023-05-16T12:20:03.807Z"
},
{
"contactId": "00000000-0000-0000-0000-000000000002",
"amount": 63,
"definitionId": 1,
"timeStamp": "2023-05-16T12:20:03.807Z"
}
]
```
When the point master calls this endpoint, Engage receives the request and puts it into a queue. A unique transaction ID is also returned. When the job "BalanceAccountToAmountJob" is run, the queue is processed and the received point balance is then set in Engage for each of the contacts, putting Engage in sync with the point master
### Track processing of request
If the point master needs to track how the requests are being processed in Engage, it can use the following endpoint along with the transaction ID it received when it posted to /api/v3/point-accounts/balances:
```hjttp theme={null}
GET /api/v3/point-accounts/balances/status/{id}
```
Be aware that this endpoint is due to be deprecated. Voyado recommend not building any new workflows using this endpoint.
The response from this call will be in this form:
```json theme={null}
{
"messages": [
{
"message": "string",
"timeStamp": "2023-05-17T11:03:16.947Z"
}
],
"id": "string",
"status": "string",
"timeStamp": "2023-05-17T11:03:16.947Z"
}
```
When Engage is acting as point follower, it does not hold the points log (points history) for a contact. The point master owns all that information. Engage, however, can fetch the points log using an external API supplied by the point master, and then display it on the contact card.
The API call will look something like this:
```http theme={null}
GET https://someUrl.com/fetchPointHistory?id=contactId
```
The value "contactId" here is the ID of the contact in question.
This URL is hosted by the point master on their end.
This URL needs to be entered into the Engage back-end. Your Voyado team will do this.
The point master needs to ensure the response from the endpoint has this form:
```json theme={null}
[
{
"transactionDate": "2023-05-08T12:06:58Z",
"amount": 1900,
"description": "Purchase of tshirt"
},
{
"transactionDate": "2023-05-08T12:02:55Z",
"amount": 1500,
"description": "Purchase of jeans"
}
]
```
Or, if the contact in question has no points yet, the response should be an empty array:
```json theme={null}
[]
```
If a points adjustment is made in Engage manually in the UI or by an automation, and Engage is acting as point follower, then that adjustment is not made right away. Instead it is sent as a request to the point master system. This is done using a webhook, provided by the point master and configured in Engage.
Once the point master has received the update, the points change will only be visible in Engage when the point master performs its next sync (see step 1 for how that works).
Points adjustments made in Engage when it is acting as point follower might not have an immediate effect. You might have to wait for the next sync from the point master.
The data sent over the webhook has the following form:
```json theme={null}
{
"eventType": "loyalty.addPoints",
"id": "70b84f00-d212-47c0-a56d-feaab6294333",
"payload": "FtaW9DkGDs8yZGxkHU5Urh5B3fYpdjJylVwlCMUj1YlqcJ+9VVxO5dIhawwF2mbDJIkP1B9IVTM9+he86ZFBcIzGLr3K9nhH1hXuc0527Pkruan5TGsanjj4Kf2+7ZueY2FG6Vu5+nEuecxsDBgREyHOynieMBKRlBn3b1AVq7vw9D3dMdE6PpDGKFVAqrxrfP8jmmnPCn7orP4qAIxq6X67D8Jya4bs6ixJvZ66HPUwkmg0cEKiAhtgUlZko9XXMMPJUvHssQuIe6zhfx2r/bH9zwfbKPCNuTQ9q74iSc2CoA9akwCgk/f+PqnYspSznEnBvbwBUYlNoq39MOjjAtoMOoZD8+Jb3SGV9UxL8rHroSlOEttp1c7mX61UFIFCdo/OluCc54ycrjIx9Jgmww==",
"tenant": "pointfollower"
}
```
The payload part is encrypted. The encryption key used must be entered into the Engage back-end, and also communicated separately to the point master system so they can perform the decryption with the same key. Once decrypted, the form of the payload will depend on whether the points adjustment was done via an automation, or manually in the Engage UI.
### Points adjustment via automation
In this case, the decrypted payload will look like this:
```json theme={null}
{
"contactId": "1dfe06cd-a1be-4423-8ed4-afd900d998aa",
"amount": 40,
"description": "Points awarded",
"source": "Automation",
"pointDefinitionId": 1,
"reason": "Voyado",
"processId": "d6342090-7410-4c00-aa4b-dbd394dac7e6",
"workflowId": "44931e65-e188-46c4-92bd-50e4818fece2",
"workflowName": ""
}
```
The attributes ProcessId, WorkflowId and WorkflowName refer to the automation.
### Points adjustment manually
In this case, the decrypted payload will look like this:
```json theme={null}
{
"contactId": "1dfe06cd-a1be-4423-8ed4-afd900d998aa",
"amount": 40,
"description": "Give points from Engage",
"source": "Manual",
"pointDefinitionId": 1,
"userId": "c23f28cb-d62d-42cf-9d11-b919198409ea",
"userName": "Jimmy User",
}
```
The `userId` and `userName` here refer to the user who made the change in Engage.
The point master system can now read the points adjustment and apply it.
## View points in Engage
As mentioned, when Engage is point follower, adjustments are not applied directly, but instead sent to the point master using the webhook, and from there back to Engage via the API when the next sync happens.
It's important that the webhook from the point master is configured in Engage before the customer starts using it, or else points updates from automations and so on will be missed.
In the Engage UI, the user can view the points added and sent out:
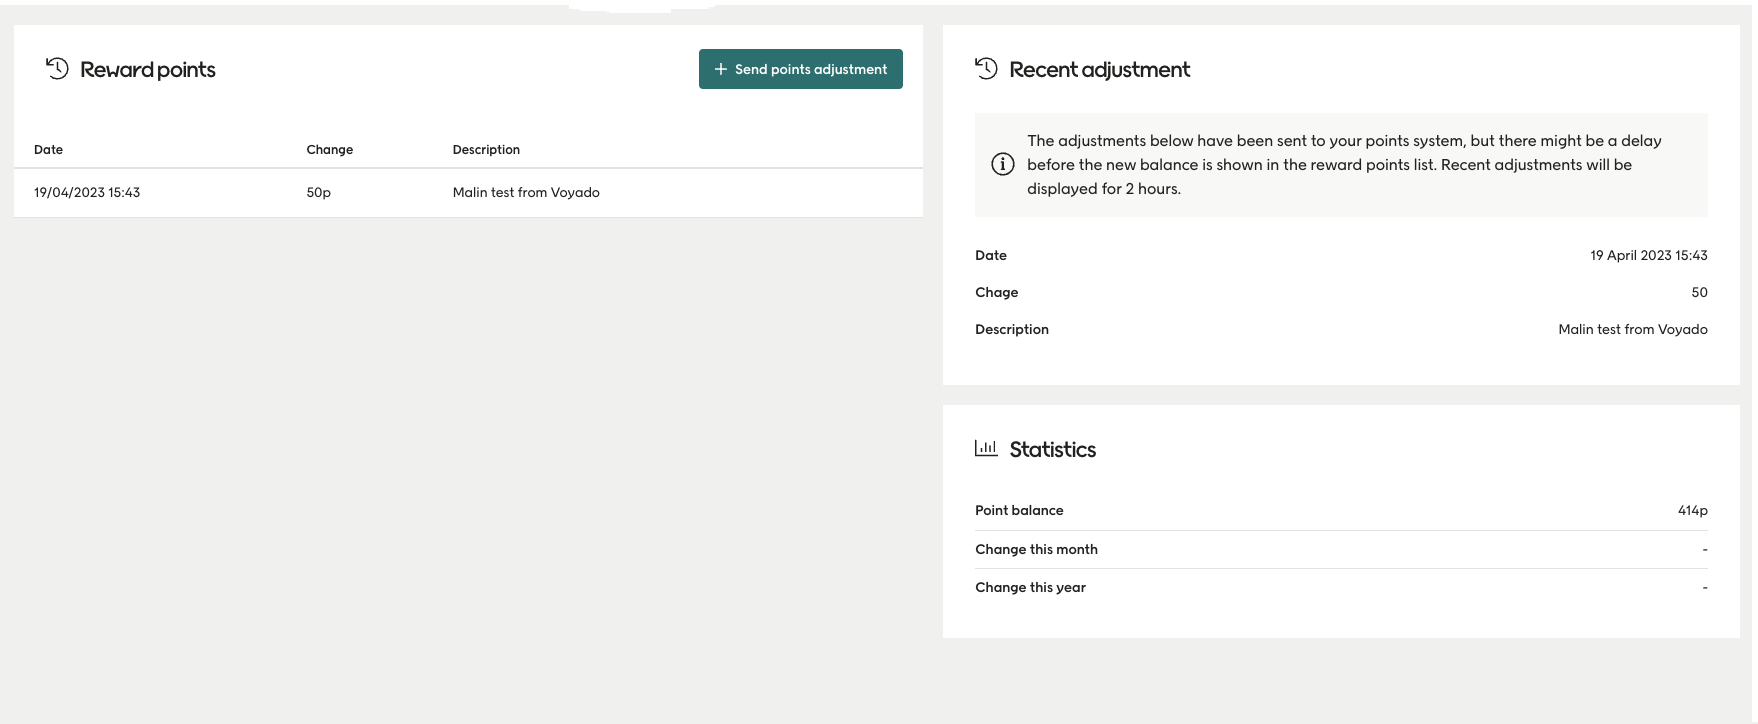 The Engage UI acts as an iFrame for showing point transactions after collecting them though the point master's API.
## Return matching
When a return is made, certain adjustments need to be made in Engage to the item and, if relevant, to the points.
The Engage UI acts as an iFrame for showing point transactions after collecting them though the point master's API.
## Return matching
When a return is made, certain adjustments need to be made in Engage to the item and, if relevant, to the points.