> ## Documentation Index
> Fetch the complete documentation index at: https://developer.voyado.com/llms.txt
> Use this file to discover all available pages before exploring further.
# Custom triggers
Engage's automation functionality lets you create individual marketing journeys for every contact in your system. Purchases, birthdays and other events can act as triggers to start up automated flows based on a specific contact's data.
You can also set up your own custom triggers that can be used to manually start automations. For example, if you want to use some event in your POS that doesn't have a built-in trigger in Engage, a custom trigger is how you can do it.
## Setting up custom triggers
You can set up custom triggers yourself in Config Hub (the Engage configuration area).
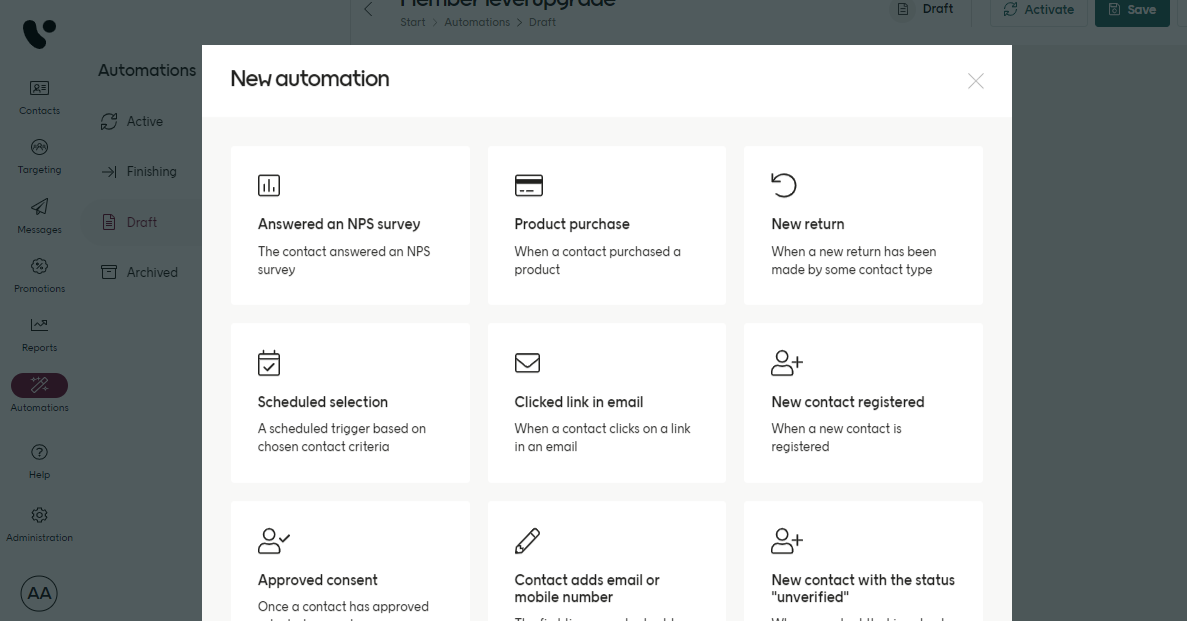
Once a custom trigger is set up, you can find it in Engage when you select "New automation". Here you can see the list of all the triggers available, with the standard ones located on top.
 At the bottom of this list, you should find your custom trigger or triggers.
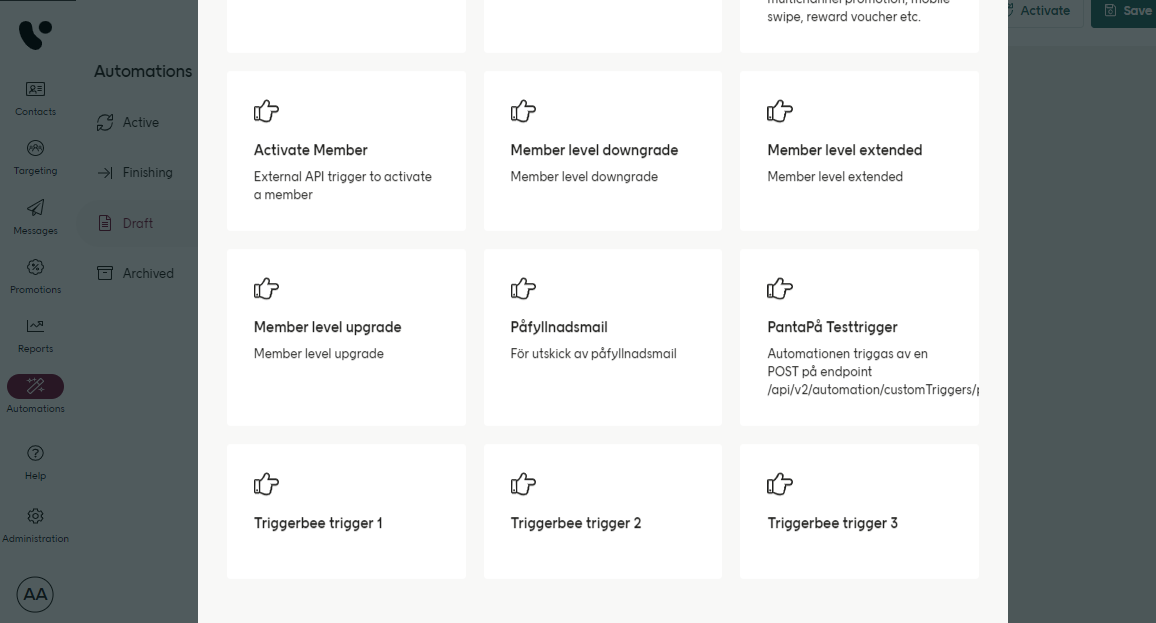 From this point on, your custom trigger can be handled like a standard one. Use it to create an automation, and create branches based on the incoming data.
Here is how a custom trigger automation looks:
From this point on, your custom trigger can be handled like a standard one. Use it to create an automation, and create branches based on the incoming data.
Here is how a custom trigger automation looks:
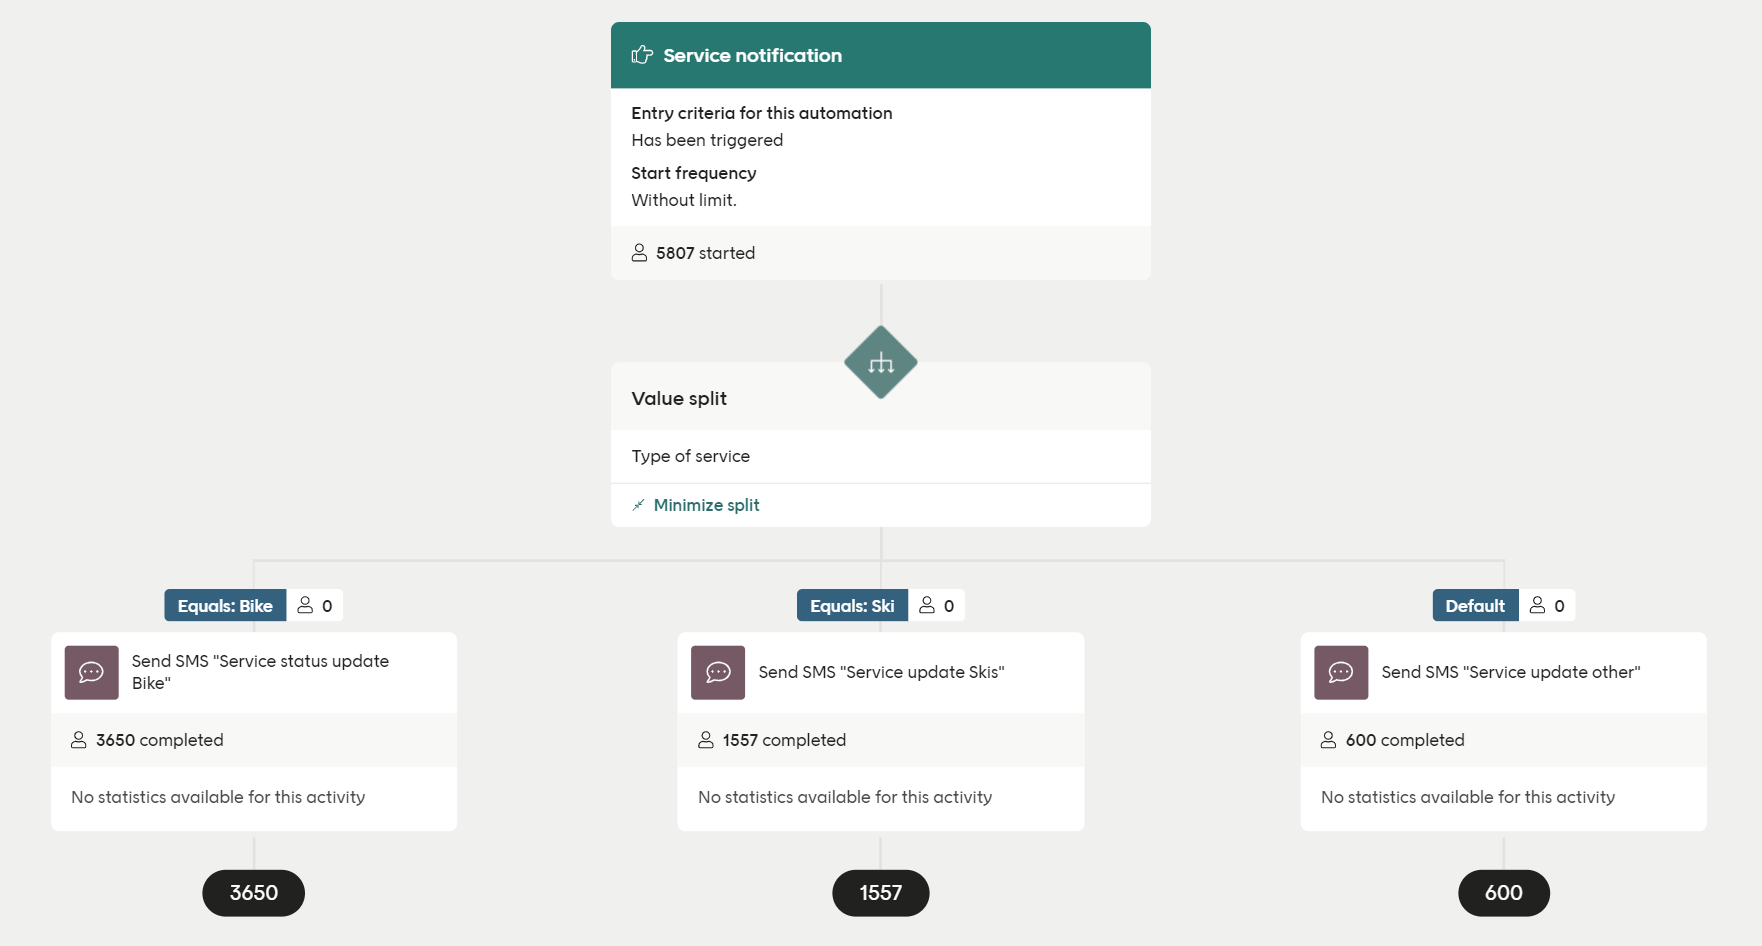 When this trigger is activated, contacts are moved into one of three branches, depending on a keyword found by a value split ("Bike", "Ski" or everything else) and then sent an SMS. The number of contacts directed into each of the three branches can be seen, as well as the total number who triggered this automation.
The important points to remember about custom triggers are:
* They are called over the API using `triggerId` plus some identifier (`contactId` or another key)
* They can receive JSON data (data fields), the structure of which is defined per custom trigger
The data fields in your custom trigger can be used both for filtering in the automation and also as variable data in the content produced by the automation.
## Custom triggers and Design Studio
When working with Design Studio, you'll also need to define the JSON schema for the custom trigger so that it can be used. How you do that is described here:
Important points:
* Your data source must be set to the `triggerId` in Design Studio
* Personalised fields in Design Studio can't be called unless defined in the custom trigger schema
* Customers cannot edit a custom trigger's schema in Config Hub once created - this can be done only by the project team and support
* Custom Triggers cannot be removed once created - this can be done only by the project team and support
You can read more here about data sources and personalized fields
## Using a custom trigger
In Engage, you can set up as many custom triggers as you want, as long as each `triggerId` is unique.
Some identifying value for the contact also needs to be sent (`contactId` or whatever is configured). The key used should be decided in collaboration with your Voyado team.
A custom trigger can only be triggered for an contact that exists in Engage.
There are a few ways to activate a custom trigger over the API, depending on what information you have:
```http If you know the contact ID theme={null}
POST /api/v3/automation/customTriggers/{triggerId}/triggerByContactId/{contactId}
```
```http If you know contact type and the key identifier value theme={null}
POST /api/v3/automation/customTriggers/{triggerId}/triggerByContactTypeAndKey/{contactType}/{keyValue}
```
```http If you know the external contact ID theme={null}
POST /api/v3/automation/customTriggers/{triggerId}/triggerByExternalContactId/{externalId}
```
```http If you know the personal identity number theme={null}
POST /api/v3/automation/customTriggers/{triggerId}/triggerBySocialSecurityNumber/{ssn}
```
### Examples of values
Here are some example values for the properties in the endpoints above:
| Attribute | Type | Example value |
| :---------- | :----- | :-------------------------------------------------------- |
| triggerId | String | myCustomTrigger |
| contactId | GUID | a67f201f-d86d-4ee2-bdc7-abce4444a804 |
| contactType | String | Member |
| keyValue | String | 46739666666 / [test@example.com](mailto:test@example.com) |
| externalId | String | 012345 |
| ssn | String | 198101010101 |
Note that a mobile phone number is sent *with* the country code ("46" in the example above) but *without* a `+` at the start.
The actual kind of value sent for `keyValue` depends on how that is set up in the Engage back-end. It could for example be a value representing "memberNumber", "email", "mobilePhone" or "externalId", depending on your particular configuration. So if `keyValue` is configured as "email" then the email address of the contact in question is sent in the API request.
## Payload example
Custom triggers are often used for transactional communication from the e-com or business layer to the end user. In these cases, a payload is often sent. Below is an example of the setup in the backend for a custom trigger that is used to populate a reset password email.
```json Custom trigger payload example theme={null}
{
"oldAccount":"true" OR "false",
"username":"[username]",
"resetUrlHTML":"[http address of unique reset link]"
}
```
The value of the `oldAccount` flag can be used to filter different kinds of communication or trigger a specific automation. All automations using a certain trigger will listen for any responding API call but only the responding data sent in the payload will start the specific automation.
When this trigger is activated, contacts are moved into one of three branches, depending on a keyword found by a value split ("Bike", "Ski" or everything else) and then sent an SMS. The number of contacts directed into each of the three branches can be seen, as well as the total number who triggered this automation.
The important points to remember about custom triggers are:
* They are called over the API using `triggerId` plus some identifier (`contactId` or another key)
* They can receive JSON data (data fields), the structure of which is defined per custom trigger
The data fields in your custom trigger can be used both for filtering in the automation and also as variable data in the content produced by the automation.
## Custom triggers and Design Studio
When working with Design Studio, you'll also need to define the JSON schema for the custom trigger so that it can be used. How you do that is described here:
Important points:
* Your data source must be set to the `triggerId` in Design Studio
* Personalised fields in Design Studio can't be called unless defined in the custom trigger schema
* Customers cannot edit a custom trigger's schema in Config Hub once created - this can be done only by the project team and support
* Custom Triggers cannot be removed once created - this can be done only by the project team and support
You can read more here about data sources and personalized fields
## Using a custom trigger
In Engage, you can set up as many custom triggers as you want, as long as each `triggerId` is unique.
Some identifying value for the contact also needs to be sent (`contactId` or whatever is configured). The key used should be decided in collaboration with your Voyado team.
A custom trigger can only be triggered for an contact that exists in Engage.
There are a few ways to activate a custom trigger over the API, depending on what information you have:
```http If you know the contact ID theme={null}
POST /api/v3/automation/customTriggers/{triggerId}/triggerByContactId/{contactId}
```
```http If you know contact type and the key identifier value theme={null}
POST /api/v3/automation/customTriggers/{triggerId}/triggerByContactTypeAndKey/{contactType}/{keyValue}
```
```http If you know the external contact ID theme={null}
POST /api/v3/automation/customTriggers/{triggerId}/triggerByExternalContactId/{externalId}
```
```http If you know the personal identity number theme={null}
POST /api/v3/automation/customTriggers/{triggerId}/triggerBySocialSecurityNumber/{ssn}
```
### Examples of values
Here are some example values for the properties in the endpoints above:
| Attribute | Type | Example value |
| :---------- | :----- | :-------------------------------------------------------- |
| triggerId | String | myCustomTrigger |
| contactId | GUID | a67f201f-d86d-4ee2-bdc7-abce4444a804 |
| contactType | String | Member |
| keyValue | String | 46739666666 / [test@example.com](mailto:test@example.com) |
| externalId | String | 012345 |
| ssn | String | 198101010101 |
Note that a mobile phone number is sent *with* the country code ("46" in the example above) but *without* a `+` at the start.
The actual kind of value sent for `keyValue` depends on how that is set up in the Engage back-end. It could for example be a value representing "memberNumber", "email", "mobilePhone" or "externalId", depending on your particular configuration. So if `keyValue` is configured as "email" then the email address of the contact in question is sent in the API request.
## Payload example
Custom triggers are often used for transactional communication from the e-com or business layer to the end user. In these cases, a payload is often sent. Below is an example of the setup in the backend for a custom trigger that is used to populate a reset password email.
```json Custom trigger payload example theme={null}
{
"oldAccount":"true" OR "false",
"username":"[username]",
"resetUrlHTML":"[http address of unique reset link]"
}
```
The value of the `oldAccount` flag can be used to filter different kinds of communication or trigger a specific automation. All automations using a certain trigger will listen for any responding API call but only the responding data sent in the payload will start the specific automation.