Consents
A consent is something that an end-user of Engage has agreed to (or not agreed to) concerning their data or their account. Proper handling of consents is important from a legal perspective. Consents turn up in the POS or, in for an e-com, on the website, and are essentially requests from the retailer which the end-user can choose to allow or deny.
An example would be: "Do you agree to receive our newsletter?"
For each contact, the consent can be in one of three states:
Yes (aka True) - The contact has agreed to receive the newsletter
No (aka False) - The contact does not want to receive the newsletter
Not set - The contact has not yet given their answer
Important
Once its value has been set, a consent can only have the value "Yes" or "No". It can never again revert to “Not set”. This is by design. The consent can, however, be changed between "Yes" and "No".
Setting up a consent
You can set up a consent in the Contact Attributes section of the Configure Engage area.
Once in the Contact Attributes section, select "Add Attribute" at the bottom of the Custom Attributes list.
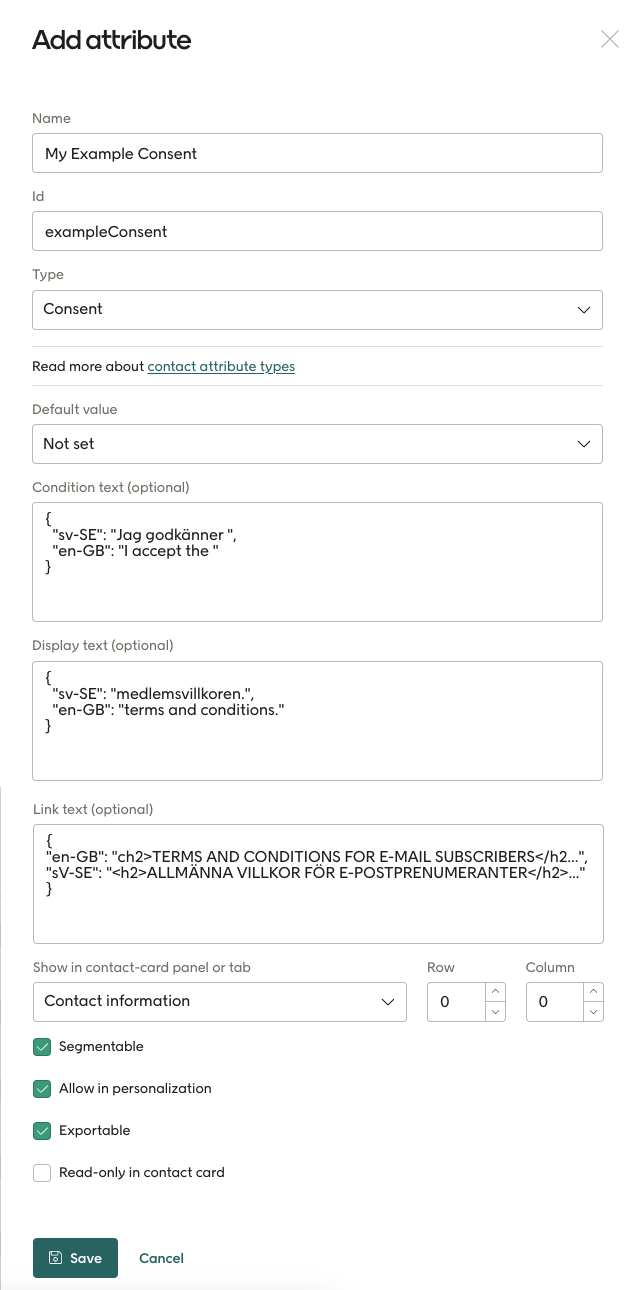
A consent definition contains a number of settings:

Name: The name of this consent as will be displayed in the POS or e-com.
Id: A unique identifier for this consent.
Type: Choose "Consent" here.
Default value: If you want the consent to have a value before it's set. Use "Not set".
The actual text shown for the contact, where they are asked to accept the consent, is made of two parts that are pasted together. These are entered as Display text and Link text:
Display text: The text displayed in the POS or e-com immediately before the link part.
Link text: The "link" part of the text that, when clicked on, leads to the full terms and conditions.
Condition text: The full terms and conditions, in HTML format (shown truncated in the image above). Normally, these would be a whole page of HTML formatted text.
Caution
Since Engage does no versioning of fields, the condition text is often stored at an external URL, managed by the customer. Your Voyado team will help you with setting this up.
The other settings are the same as for all custom attributes. Read more about those here.
Be sure to hit "Save" when you are finished to save the consent in Engage.
Important
As seen in the image above, the texts in these three fields can be localized following the standard for language culture names (sv-SE, en-GB, fr-FR and so on).
Seeing all consents for a tenant
There can be more than one consent in use. To see the all consents for a tenant, this endpoint is used:
GET /api/v2/consents
This returns a JSON array with all the consents for that tenant (or an empty array if there are no consents). Note that this holds no information about how individual contacts have responded to the consents.
[
   {
      "name":"Consent for Prescription Purchase",
      "id":"consentRX",
      "metaData":{
         "displayText":{
            "en-GB":"I consent to Rx purchases."
         },
         "linkText":{
            "en-GB":"Read the terms here."
         },
         "conditionText":{
            "en-GB":"The terms as a HTML block."
         }
      }
   },
   {
      "name":"Consent for Membership Terms",
      "id":"consentMemberTerms",
      "metaData":{
         "displayText":{
            "en-GB":"Yes, I consent."
         },
         "linkText":{},
         "conditionText":{}
      }
   }
]
Getting a contact's consent states
By fetching a contact's data using the /contactoverview endpoint, you can see what consents exist for this contact, and what their state is.
{
  "firstName": "Example",
  "email": "example@example.com",
  "countryCode": "SE",
  "contactType": "ExampleContactType",
  "preferences": {
    "acceptsEmail": true,
    "acceptsPostal": true,
    "acceptsSms": true
  },
  ...
  "consents": [{
      "id": "consentMemberTerms",
      "value": true,
      "date": "2022-01-01T00:00:00+0100",
      "source": "ECOM",
      "comment": "Approved member terms at checkout"
   }]
}
Note that only consents with a value or "true" or "false" will be shown in this response. So if a consent is not set, it will not show up here. You can, however, fetch all the consents through /consents and combine that with the consent data returned for an individual contact. In this way, all consents can be shown for a contact (for example, in the POS) even if their value is not set.
Tip
By combining all the consents for a tenant from /consents with a specific contact's consents fetched from /contactoverview, you can build up a complete picture of the consents for that specific contact, including the ones not set.
Giving or revoking a consent
Setting the state of a consent for an individual contact is done in the same way as for any contact update:
POST /api/v2/contacts/{contactId}
In the body of the update request, add the consent like this:
{
   "consents":[{
         "id": "consentMemberTerms",
         "value": true,
         "comment": "Some comment here",
         "source": "POS"
     }]
}
This example would set the state of the "consentMemberTerms" consent to true (or Yes).
Double opt-in
The double opt-in flow is covered in this Help Center article.