Custom data sources
Important
This information is relevant for Email Design Studio. To see how custom data sources / external data sources work in the classic email editor, go here.
A custom data source allow you to import real-time information from other systems into Engage and make that data accessible in the Email Design Studio, where it can be used in send-outs.
There are basically two ways to work with custom data sources: URL mode and API mode.
URL mode: This mode is the simpler one, in that the input JSON you supply when configuring the data source is used to create input fields in the Design Studio UI. The values in these field you can then use to dynamically build an URL that can be used in your email (for example as an URL to an image). Services such as Relewise use this mode.
API mode: Here a call is made to an API endpoint (which can be static or dynamic) with a JSON payload that has a structure you've defined. The response will be another JSON containing data you can then use in the email. An example of such an API endpoint (this one using dynamic parameters) is:
https://yourdomain.com/api-endpoint/{Site}/?id={ProductIds}Both of these modes are discussed in more detail further down.
Important
In both modes, custom data will be fetched for each send-out batch when the mail is sent. The data actually used may differ from contact to contact based on their marketing group. Custom data sources cannot be used for retrieving personal data.
Basic configuration of a custom data source
Configuration of custom data sources is done in the Configure Engage area of your Engage UI. Both modes are configured here, but in slightly different ways.
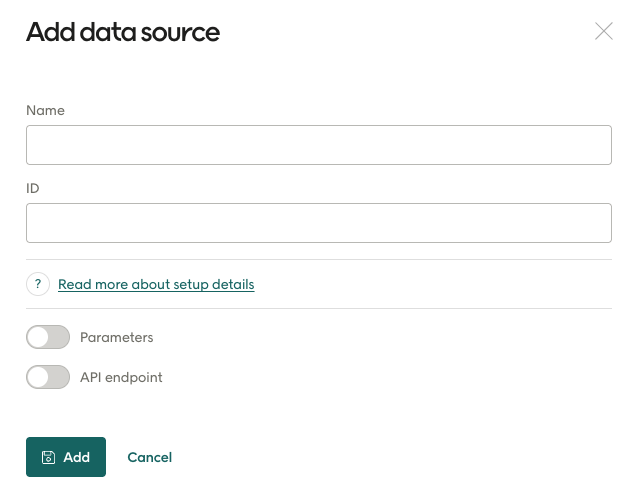
Regardless of mode, every custom data sources will need a Name and an ID:
Name: This is the name that will be shown in the Email Design Studio, allowing this data source to be selected there and the data from it to be used.
ID: This is the internal ID of the data source (lower case with underscore). This must be unique. An error will be shown if you try to save a custom data source using an ID that's already in use by another data source. If you need to, you can edit / open already existing custom data sources to check their IDs.
Caution
You will not be allowed to create a custom data source using an ID that is in use by another custom data source. You can open any already existing data sources to check their IDs, if you need to.
What you enter after this depends on whether you are using API or URL mode.
API endpoint (API mode)
The API endpoint toggle reveals these settings, which are only used in API mode:
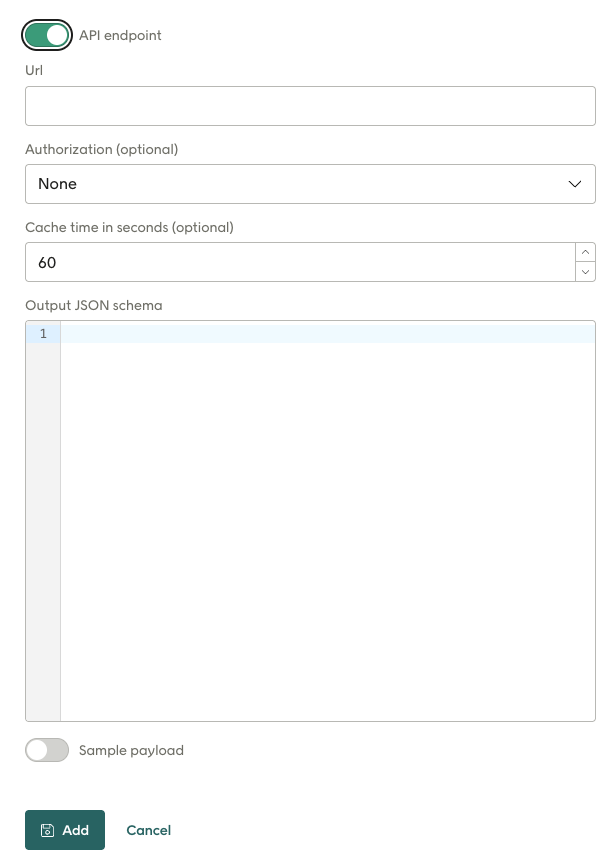
URL: This is the URL to the endpoint to be called to fetch the data. It can be static or can include parameters defined by {name}, as shown here.
Example 1: A static API endpoint:
https://yourdomain.com/api-endpoint
Example 2: A dynamic API endpoint with parameters. The parameters must be defined in the Input schema (under Parameters - see next section).
https://yourdomain.com/api-endpoint/{Site}/?id={ProductIds}Authorization: Choose "None" or "API key" here (which reveals the following two fields).
Header key: Enter the name of the authorization key, for example "api-key".
Value: Enter the key secret.
Cache time in seconds: This specifies long Engage will cache the response. So if the exact same call is repeated inside the caching time, the cached response will be used inside of calling the endpoint again. Enter 0 here if you don't need it to be cached.
Output JSON schema: This JSON schema informs the system of the form of the return data. The properties listed here are made available in your email layout for personalization fields, repeaters and display conditions. Example value for this schema:
{
  "$schema": "https://json-schema.org/draft/2020-12/schema",
  "type": "object",
  "properties": {
    "productList": {
      "title": "Product List",
      "type": "array",
      "items": {
        "type": "object",
        "properties": {
          "itemNumber": {
            "title": "Article number",
            "type": "string",
          },
          "imageUrl": {
            "title": "Image url",
            "type": "string",
          },
          "link": {
            "title": "Link url",
            "type": "string",
          },
          "name": {
            "title": "Product title",
            "type": "string",
          },
          "leftinstock": {
            "title": "Number in stock",
            "type": "integer"
          },
          "releasedate": {
            "title": "Release date",
            "type": "string",
            "format": "date",
          },
          "oncampaign": {
            "title": "Ongoing campaign",
            "type": "boolean",
          },
       },
        "required": [
          "itemNumber",
          "imageUrl",
          "link",
          "name"
        ]
      }
    }
  }
}
Warning
Be careful with required properties. If any of them are missing in the payload that is returned, the data will be seen as invalid and will not be not sent to Design Studio.
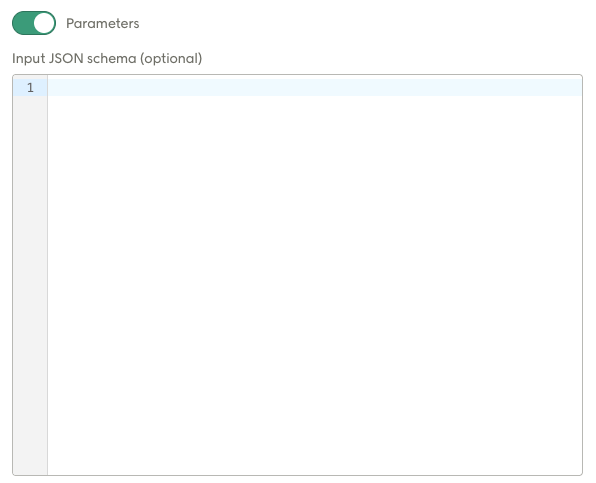
Parameters (URL mode)
Sliding the Parameters toggle reveals the Input JSON schema. The JSON schema entered here defines the input fields that are shown in the Design Studio UI, allowing you to configure this call.
Note
This field is used in both URL mode and API mode. URL mode will ONLY use this.
An example value for this field would be the following:
{
    "$schema": "https://json-schema.org/draft/2020-12/schema",
    "type": "object",
    "properties": {
        "Site": {
        "title": "Website language",
            "type": "string"
        },
        "Numberof": {
            "title": "Number of products",
            "type": "integer",
            "minimum": 1,
            "maximum": 5
        },
        "Range": {
            "title": "Range",
            "type": "number",
            "minimum": 0.1,
            "maximum": 9.9
        },
        "Sortorder": {
            "title": "Sort order",
            "enum": [
                "lowestprice",
                "highestprice"
            ],
            "type": [
                "string"
            ]
        },
        "Productids": {
            "type": "array",
            "items": {
                "type": "string"
            }
        }
    },
    "required": [
        "Productids",
        "Sortorder"
    ]
}
Here are the data formats used in the URL and the corresponding one used in Design Studio:
Data type | In the URL | In Design Studio |
|---|---|---|
string | String | String input |
integer | integer string | Number input |
number | Number as string | Number input |
enum | Enum as string | Single select |
array | Comma separated strings | Multi string input |
For the example input JSON schema given above, the Design Studio would show the following in the Engage UI (but of course the fields would initially be empty):
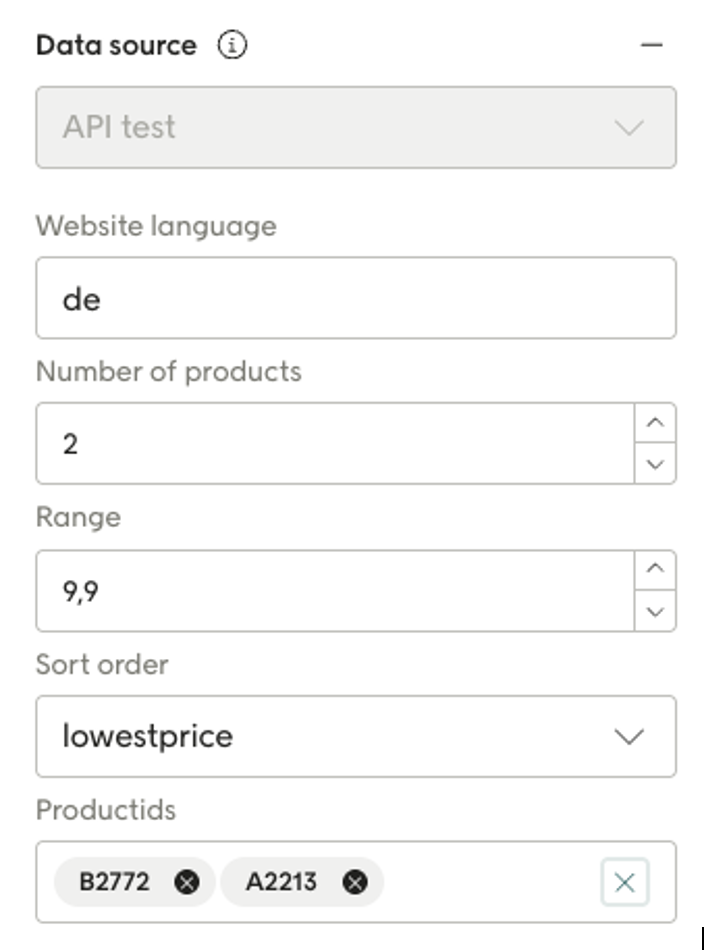
Data shown in Design Studio
The properties from the Output JSON schema can be used in your email layout in various ways:
For personalization: For example, you could add a personalized field for "leftinstock" to a text and one for "link" to a button since these are properties returned from the data source.
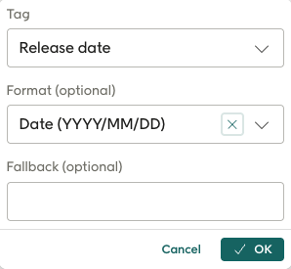
The Design Studio will also allow the user to format the data, based on the data type, as in the example show for "Release date" above..
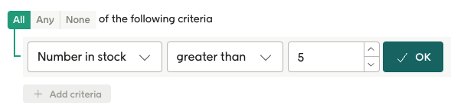
For display conditions: Properties can be used for display conditions like this:
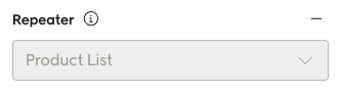
For repeaters: Arrays in the schema can be presented using repeaters in Design Studio.