- Connected recommendations – Elevate generates dynamic product recommendations that can be used directly in Engage’s Design Studio.
- Audience-driven personalization – Elevate personalizes the on-site experience based on audiences created in Engage.
- Current interest audiences – Engage audiences can be built using real-time behavioral data from Elevate.
- Smarter recommendations – Elevate’s recommendations are enhanced with in-store purchase data captured by Engage.
discoveryKey.
This article looks at how this integration between Engage and Elevate is done.
Customer key in Elevate
In Elevate, thecustomerKey is the unique identifier for a visitor on the website.
A customerKey is required for every request to the Elevate API, whether for notifications or queries. To link a visitor in Elevate to an Engage contact, the customerKey from Elevate should be stored in the discoveryKey contact attribute within Engage. This enables cross-platform understanding of the visitor and enhances personalization capabilities for both Elevate and Engage.
Identifying the visitor
There are two general ways a visitor can be identified:- Upon entry
- During the session
1 - Identification upon entry
1 - Identification upon entry
When a visitor enters the site, they may arrive wither organically, from a referral or through a newsletter.What happens next in this case depends on the 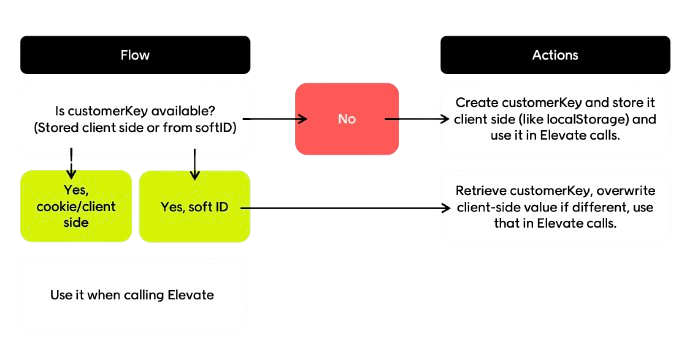
customerKey:- If a
customerKeyis already available (stored client-side or retrieved fromsoftId), use it in all Elevate calls - If no
customerKeyexists, create one, store it client-side (localStorage or cookie) and then use it in Elevate calls - If a visitor arrives via
softId(from an Engage newsletter), you’ll need to decode thesoftId, retrieve the matchingcustomerKey, and overwrite the local value ofcustomerKeyif it is different
2 - Identification during session
2 - Identification during session
If the customer is not identified at entry (see above), they can be identified during the session if they: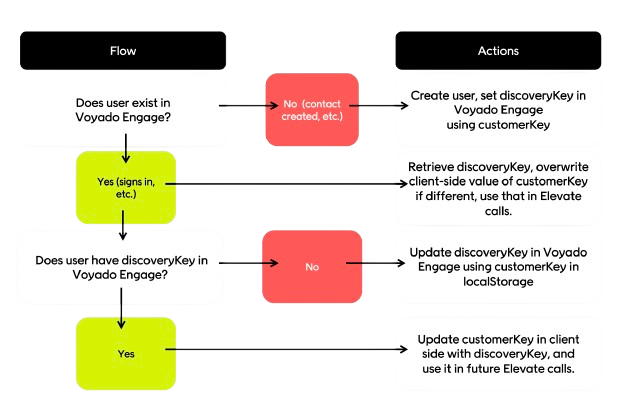
- Creating an account
- Logging in to an existing account
- Signing up for a newsletter, wishlist, or reminder
- Placing an order
After identification
When the visitor has been identified, check if they exist in Engage.- If they don’t exist, create the contact and assign
discoveryKeyto thecustomerKeyvalue - If they do exist, retrieve and compare the
discoveryKeyto the client’scustomerKeyand if the values are different, overwrite the client-sidecustomerKeywith the EngagediscoveryKey
Best practices for identification
- Ensure Engage is updated with the
discoveryKeyfor all members (visitors who can sign in) - All
discoveryKeyvalues must be unique; duplicate values in Engage prevent personalization - Always call Elevate with the existing
customerKeywhen a visitor is identified - Use Engage’s
softIdfor newsletters to maximize identification rate and cross-system linking - Define a single source of truth for the
customerKey, for example thediscoveryKeyin Engage, to resolve conflicts between local and server values
Integration flows
Now we will examine the different flows for the three types of visitor:- New visitors
- Returning visitor
- Newsletter visitors
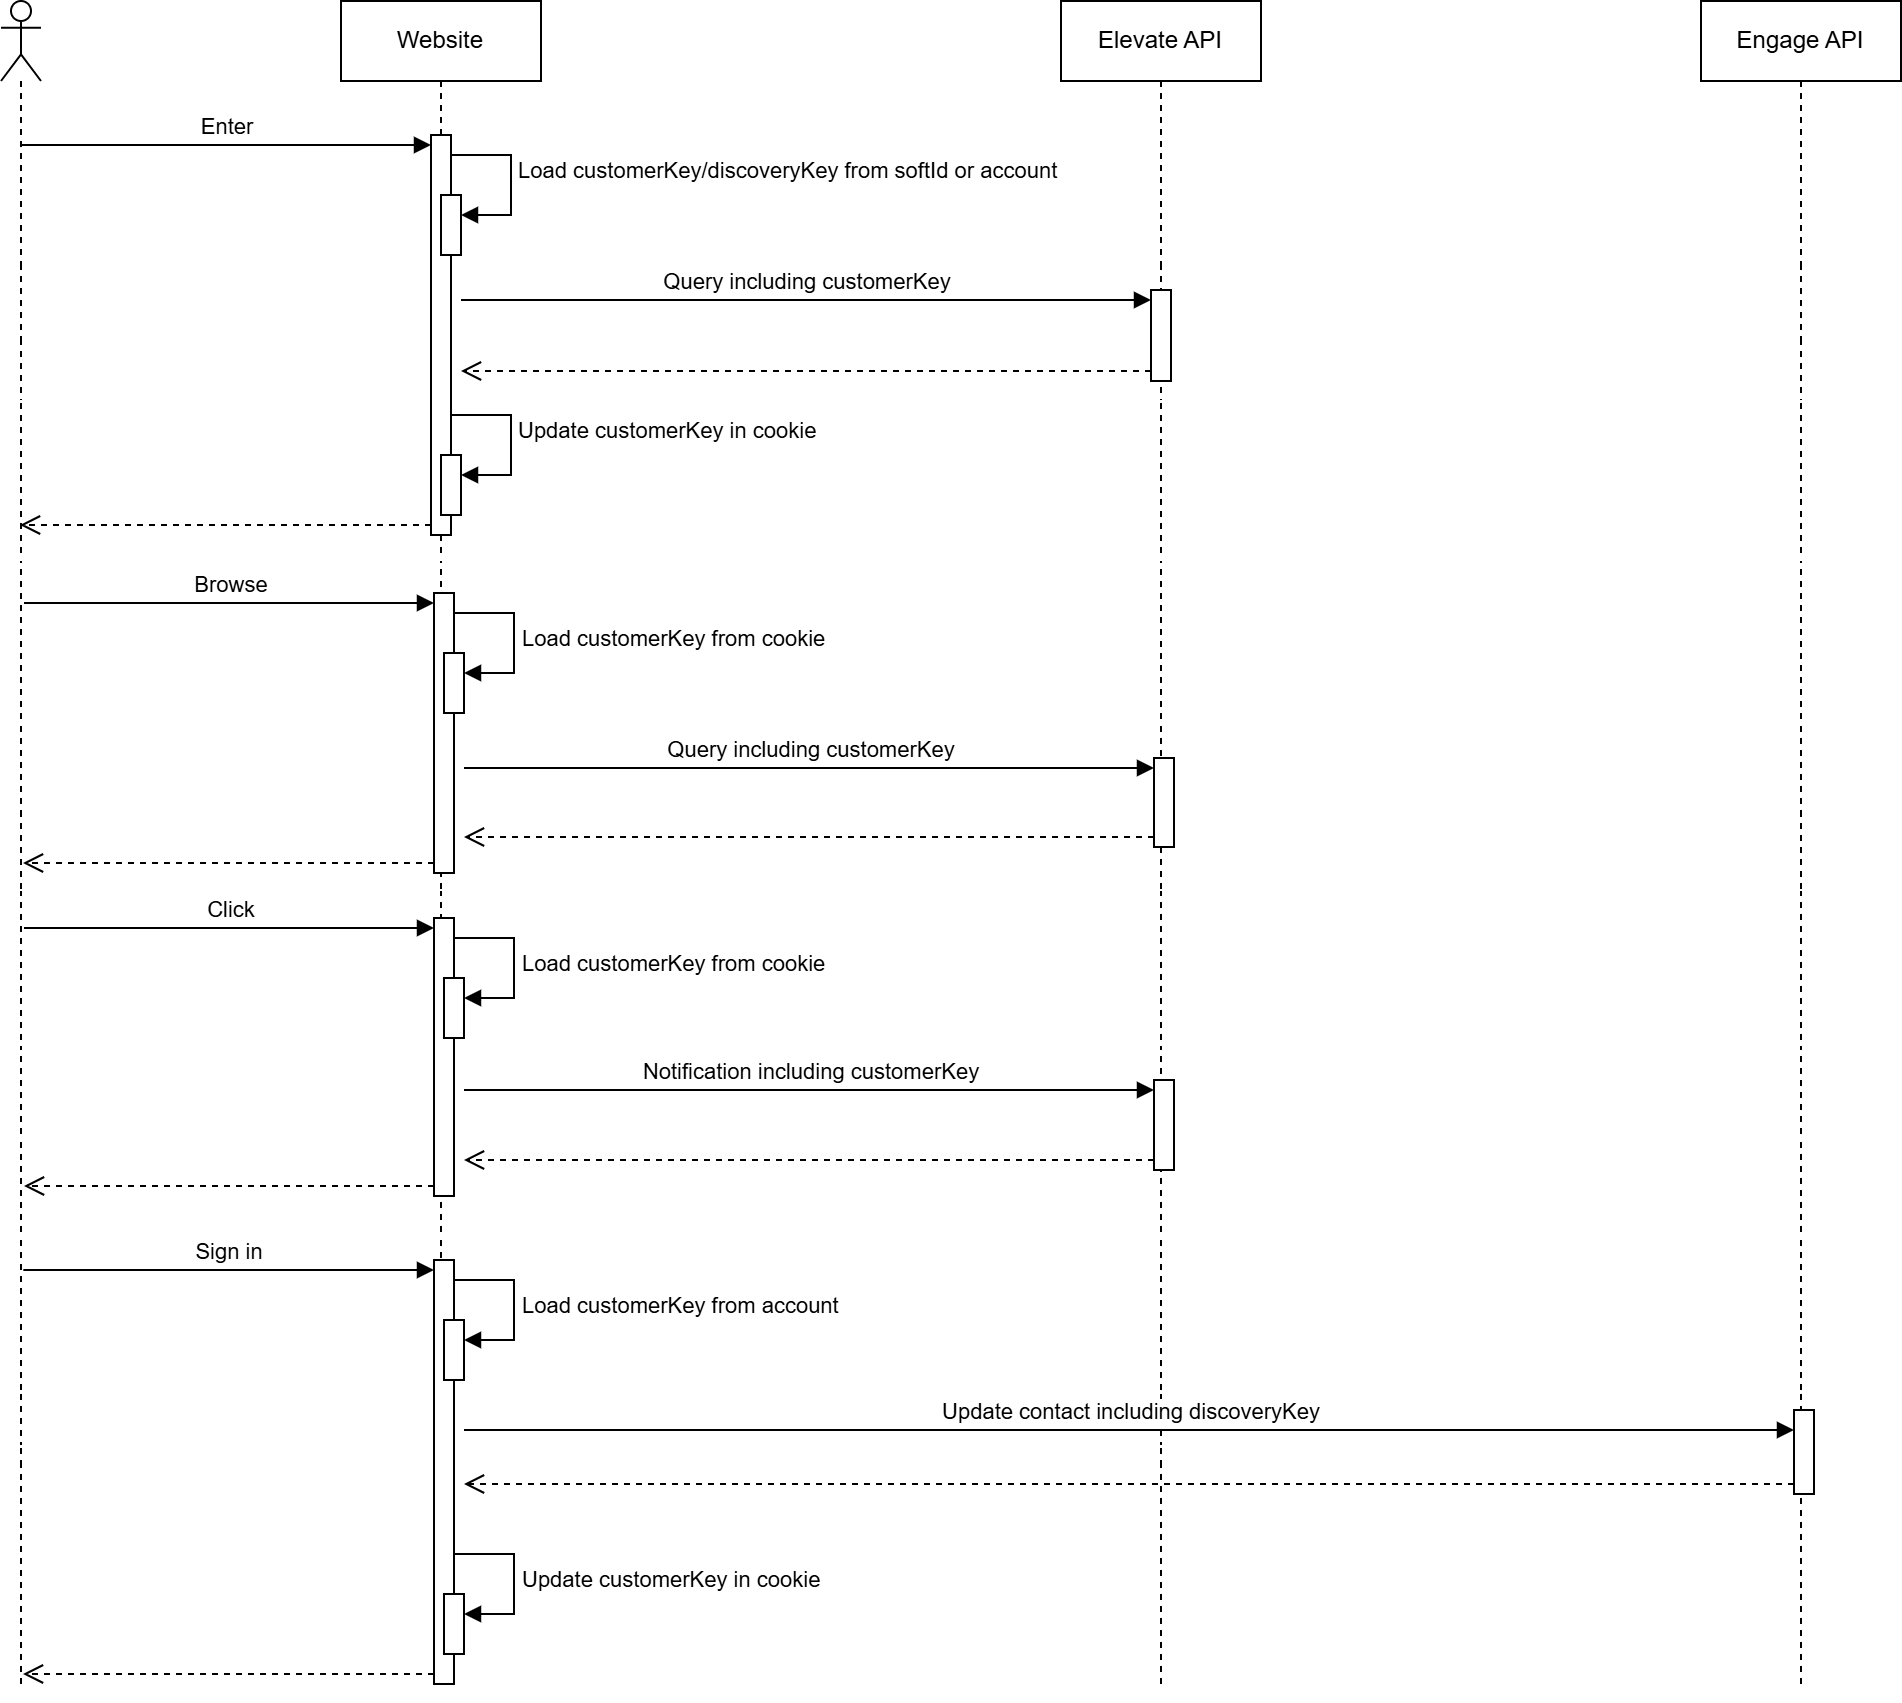
New visitor flow
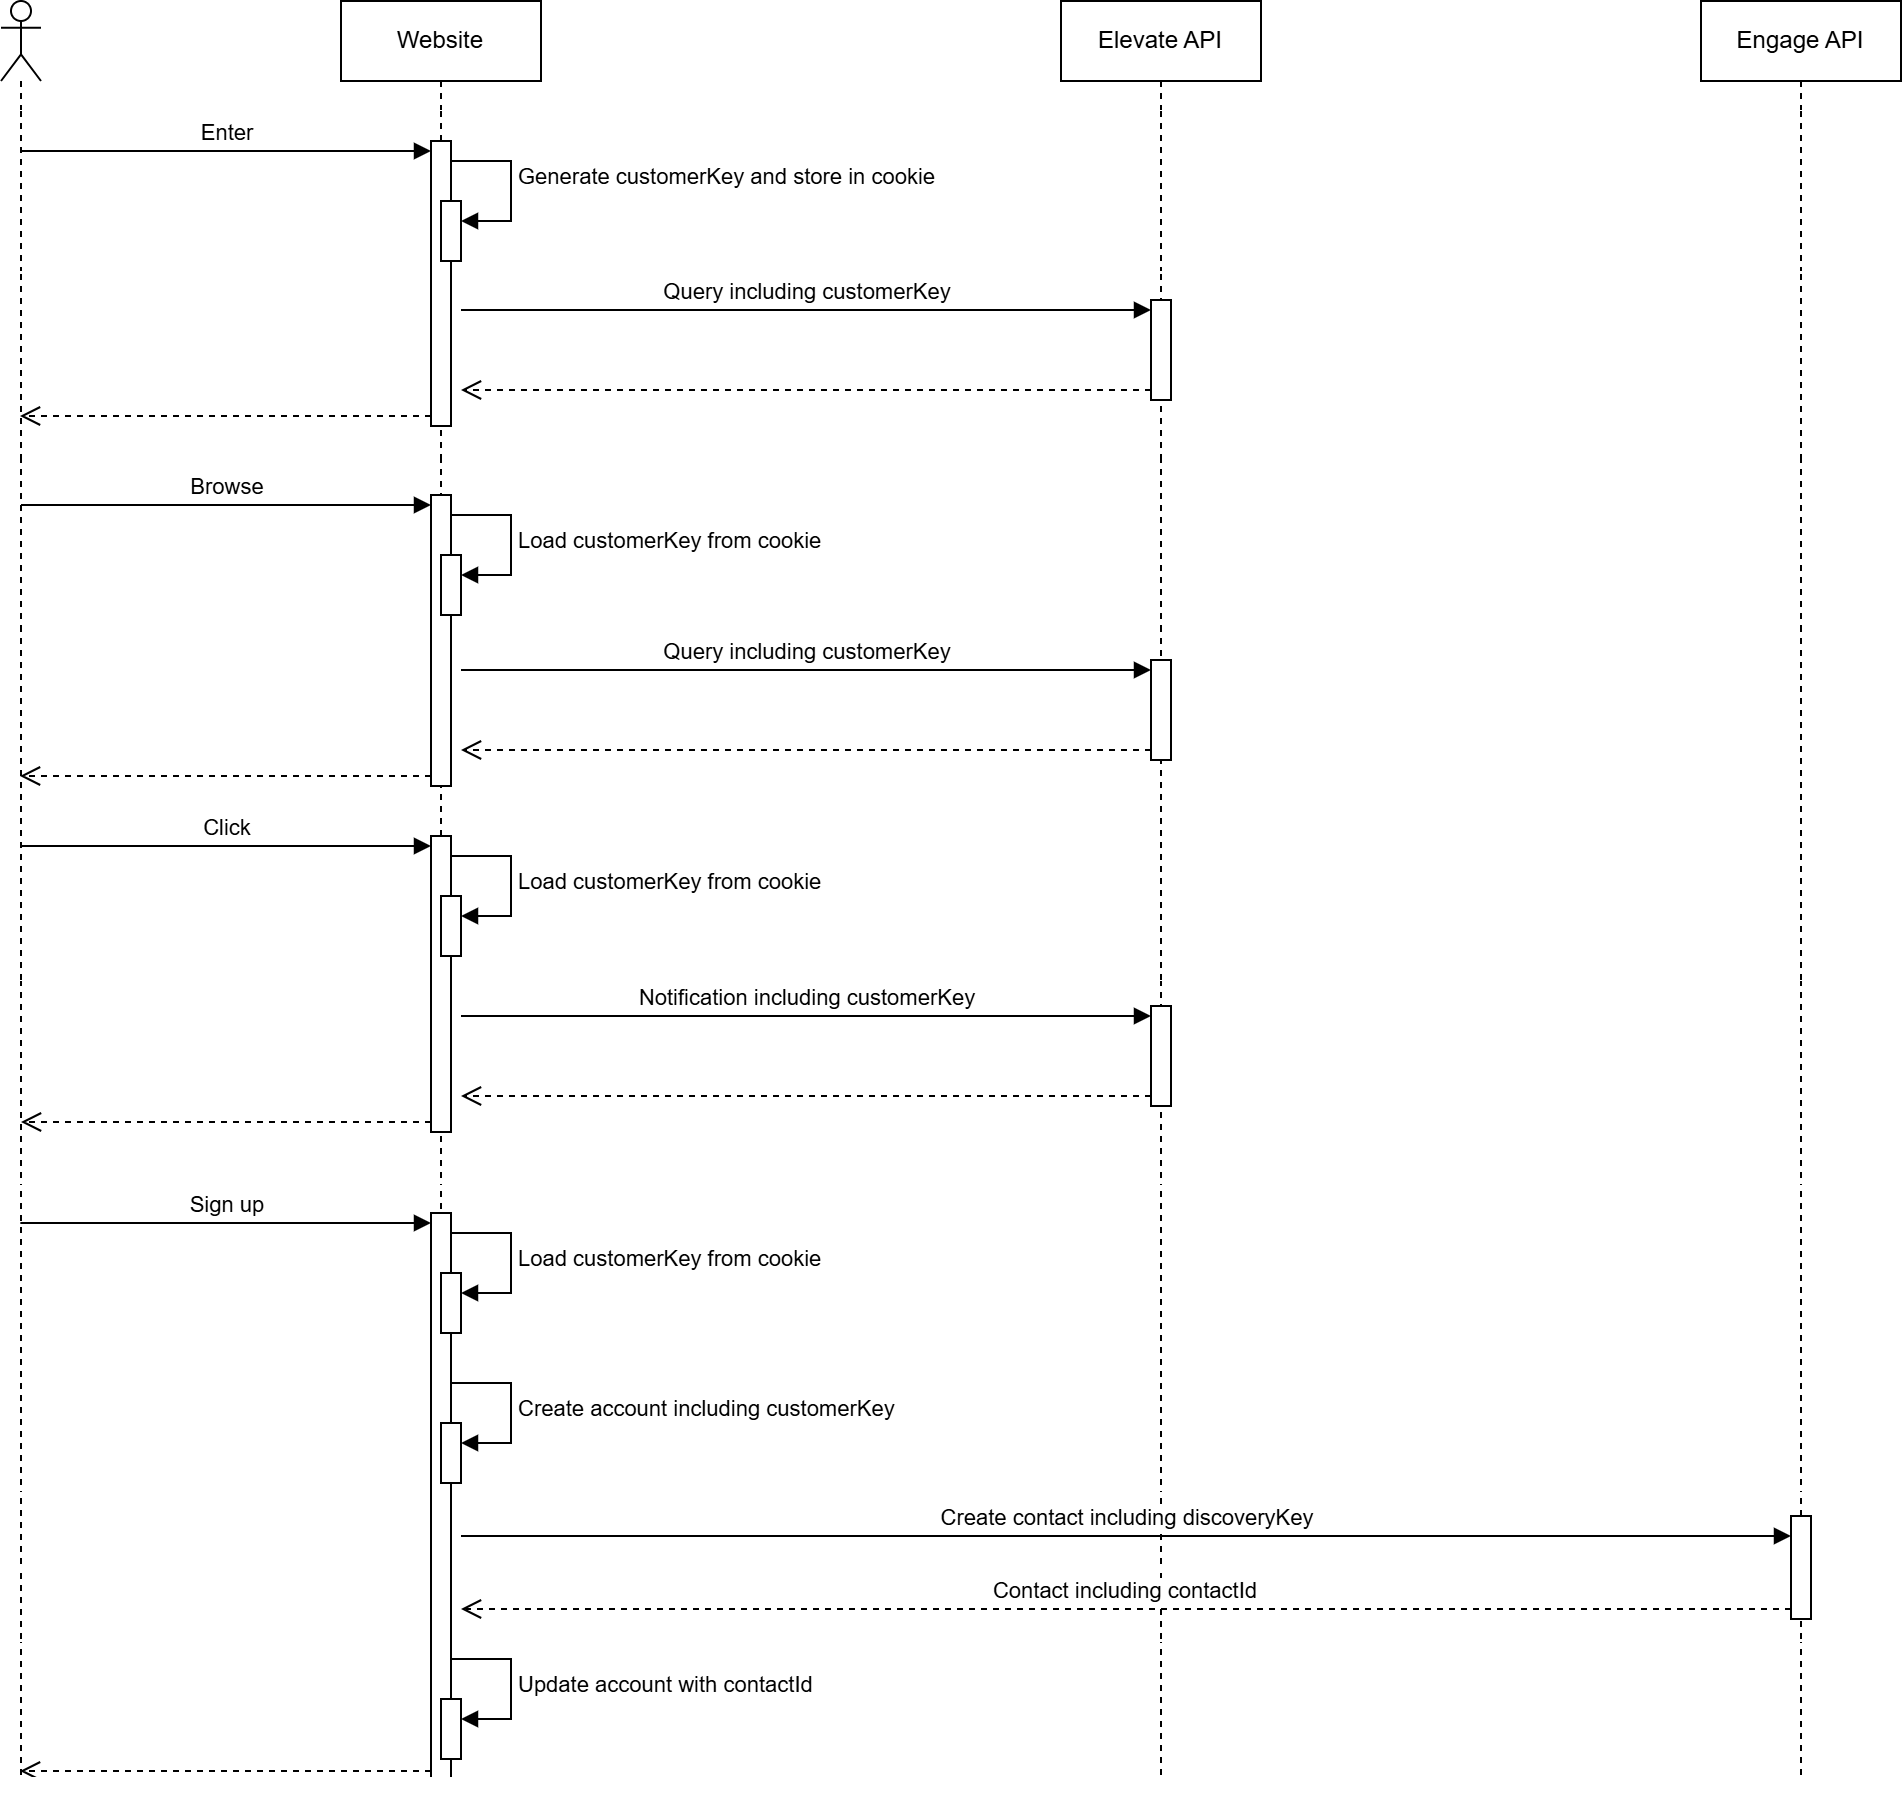
The visitor enters
When the visitor enters the site:
- Generate a new
customerKey - Store that
customerKeyvalue on the client side
The visitor browses
When the visitor browses, for example, a category or product page:
- Read
customerKeyfrom the client side - Call Elevate API with
customerKey
The visitor clicks
When the visitor clicks on, for example, a navigation link, add to cart or add favorite:
- Read
customerKeyfrom the client side - Call Elevate API with
customerKey
The visitor signs up
When the visitor signs up:
- Read
customerKeyfrom the client side - Create user account with
customerKey - Call Engage API to create new contact with
discoveryKey - Update user account with
contactIdfrom Engage This should create a mapping between the user account, the ElevatecustomerKey, and the EngagecontactId.
Returning visitor flow
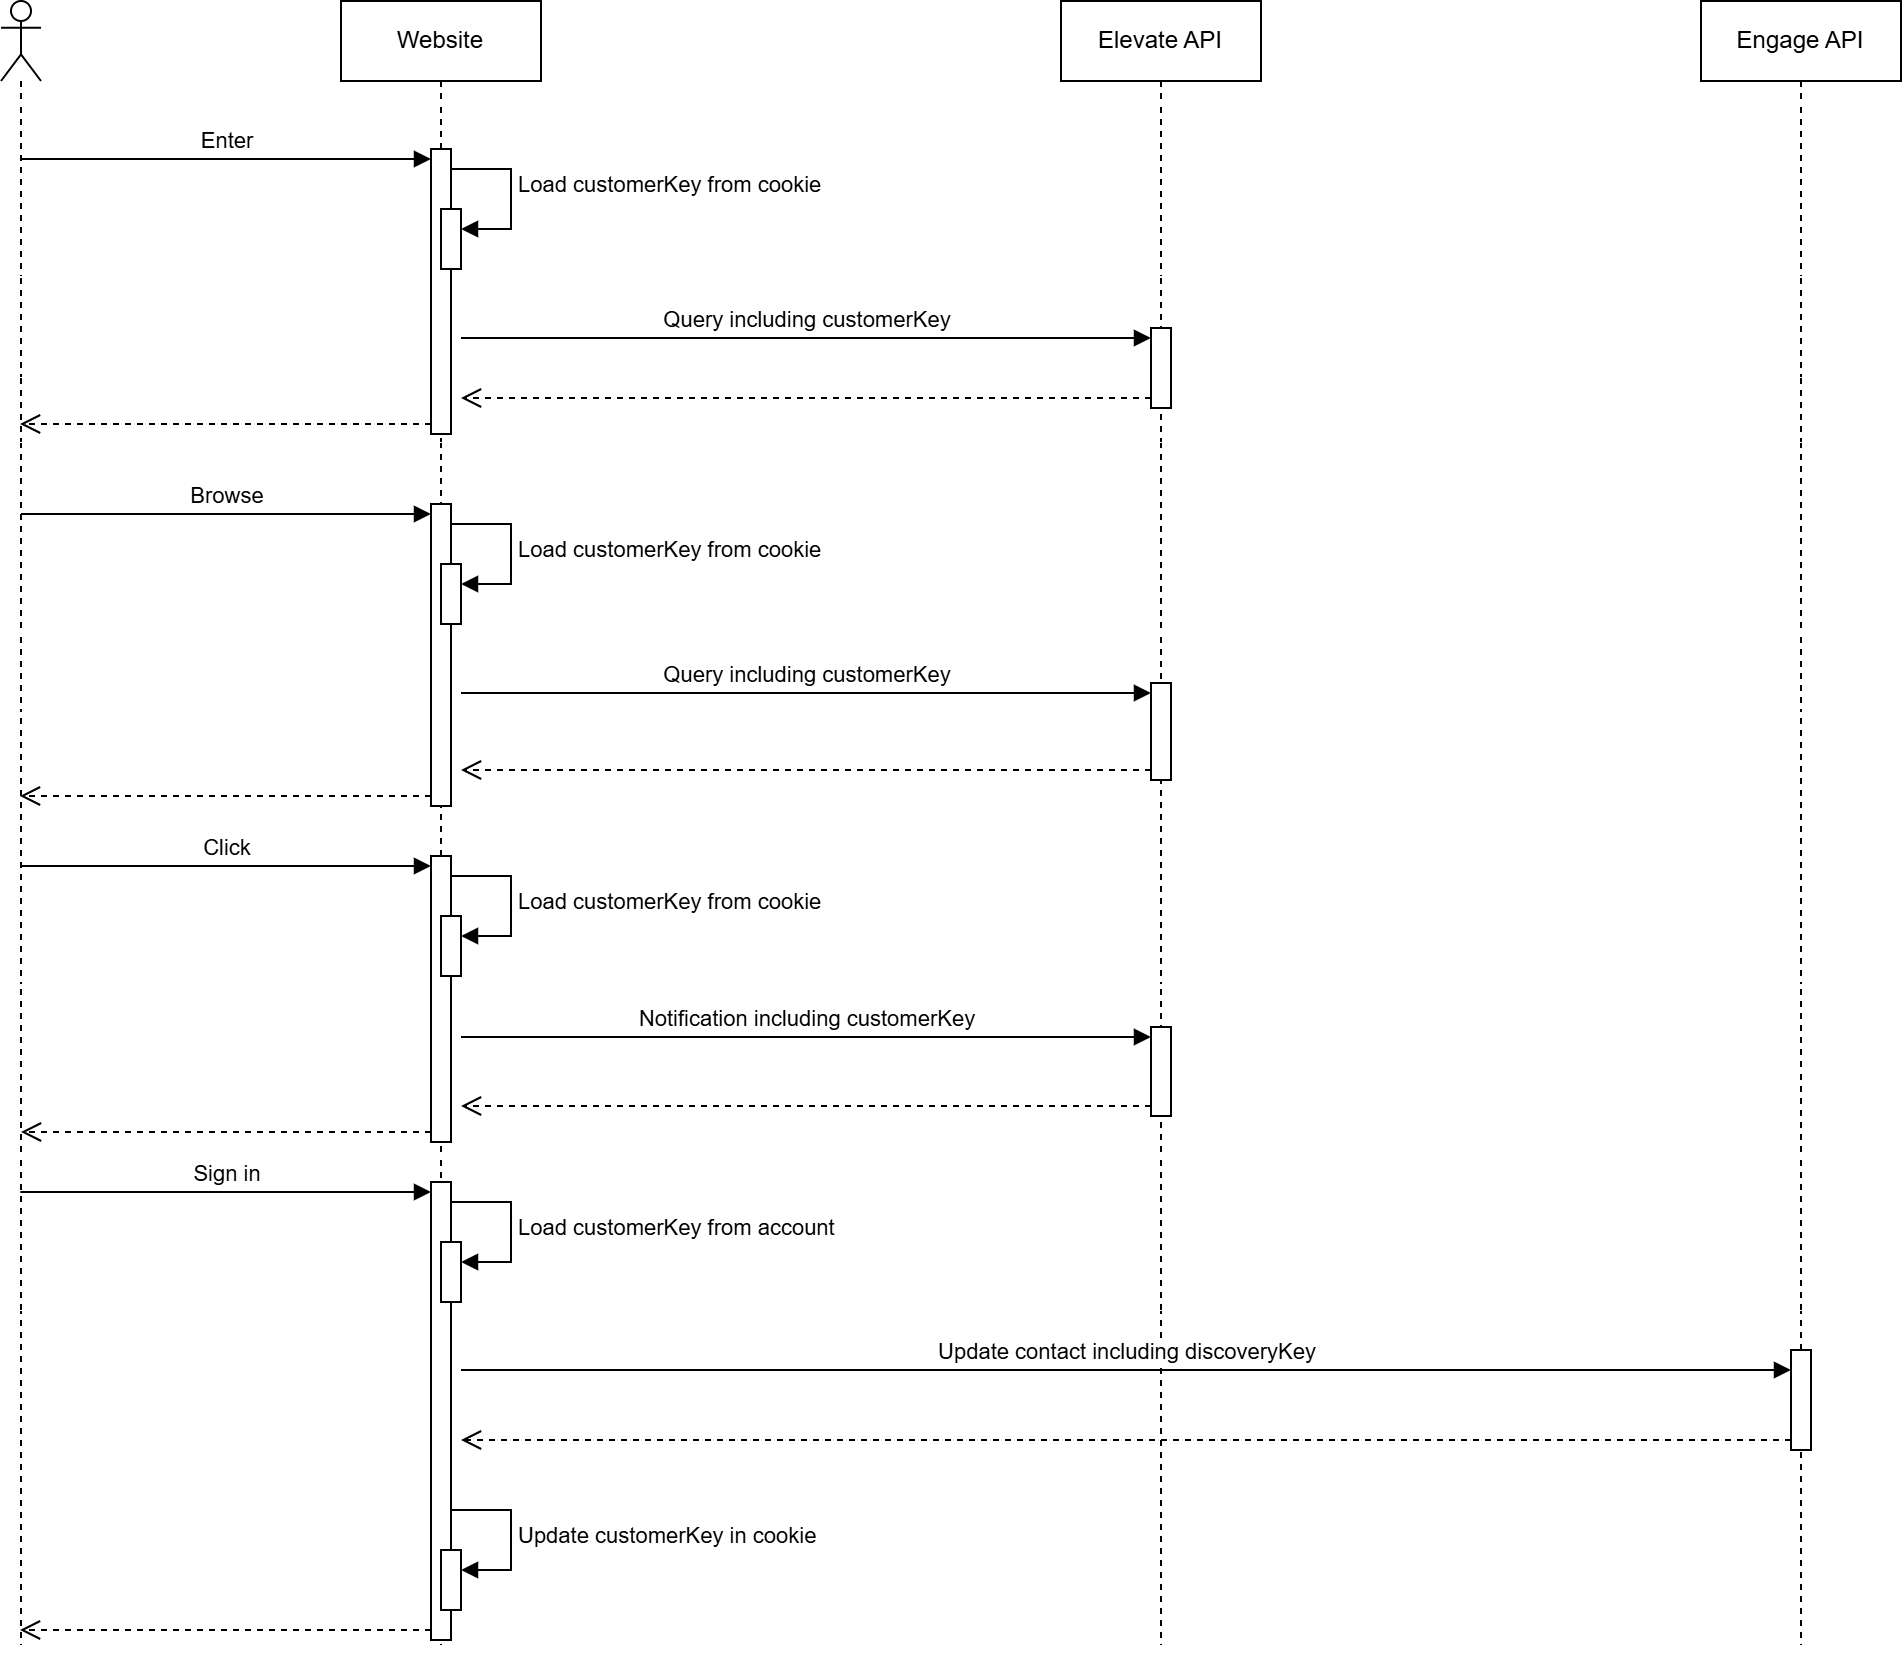
The visitor browses
When the visitor browses, for example, a category or product page:
- Read
customerKeyfrom the client side - Call Elevate API with
customerKey
The visitor clicks
When the visitor clicks on, for example, a navigation link, add to cart or add favorite:
- Read
customerKeyfrom the client side - Call Elevate API with
customerKey
The visitor signs in
When the visitor signs in:
- Read
customerKeyfrom user account - Call Engage API to update contact with
discoveryKey - Update the client side with
customerKeyThe visitor is now identified, and the existingcustomerKeyfrom the user account may differ from thecustomerKeyon the client side. Therefore it is important to use thecustomerKeyfrom the user account when calling the Engage API and to update the client side value accordingly
Newsletter visitor flow
The visitor enters
When the visitor enters the site:
- Decode
softIdand identify visitor - Read
discoveryKeyorcustomerKeyfrom decodedsoftIdor from user account - Update the client side with
customerKey
The visitor browses
When the visitor browses, for example, a category or product page:
- Read
customerKeyfrom the client side - Call Elevate API with
customerKey
The visitor clicks
When the visitor clicks on, for example, a navigation link, add to cart or add favorite:
- Read
customerKeyfrom the client side - Call Elevate API with
customerKey
Identifying email traffic by discoveryKey
ThediscoveryKey is an integral part of the Engage soft login (previously called auto-login) and needs to be activated by your Engage specialist.
Soft login is critical for maximizing identification across Engage, Elevate, and between the two products. A high identification rate is the foundation for realizing the full value of the integrated Engage–Elevate setup.
The soft login happens via an encrypted query string parameter named “eclub” which holds information about the contact who has clicked on a link, such as a URL in an email campaign.
The target site back-end can listen to this query parameter and decrypt it. The decryption of the soft login should never be done on the client side for security reasons and GDPR concerns. The encryption key property in the module settings should also never be shared or made accessible in client implementations.
A soft (auto) login URL might look like this:
Example of soft login
discoveryKey which is the identification key (customerKey) used in interactions with Elevate.
Decrypted payload
Engage soft identification on Elevate powered websites
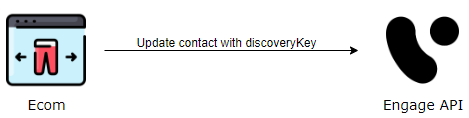
A customer website running both Engage and Elevate must decrypt the soft login server-side and use the resultingdiscoveryKey as the customerKey in all subsequent calls to Elevate.
This ensures that traffic originating from Engage (for example email campaigns) is correctly identified in Elevate, allowing personalization, tracking, and recommendations to be applied consistently from the first page view.
If the decrypted payload does not contain a discoveryKey, it indicates that the contact has not previously been identified in Elevate and should be treated as a new or anonymous visitor.
SKU and variant key need to match
In Engage the SKU (stock-keeping unit) is a standard article property. Elevate, however, refers to articles as products, and the variations of products as variants.Read about variants in Elevate
variantKey that corresponds to the article SKU in Engage.
Several features depend on these values being aligned. For example, Engage retrieves product metadata from Elevate to render product recommendations, and matching keys are also required for Elevate to consume in-store purchase data from Engage.
If the Engage and Elevate feeds are not aligned, contact your Engage representative to discuss next steps. Be aware that some features will be unavailable until the feeds are aligned.
Verifying discoveryKey implementation
The e-com platform/site should includediscoveryKey in every create/update contact request made to the Engage API.
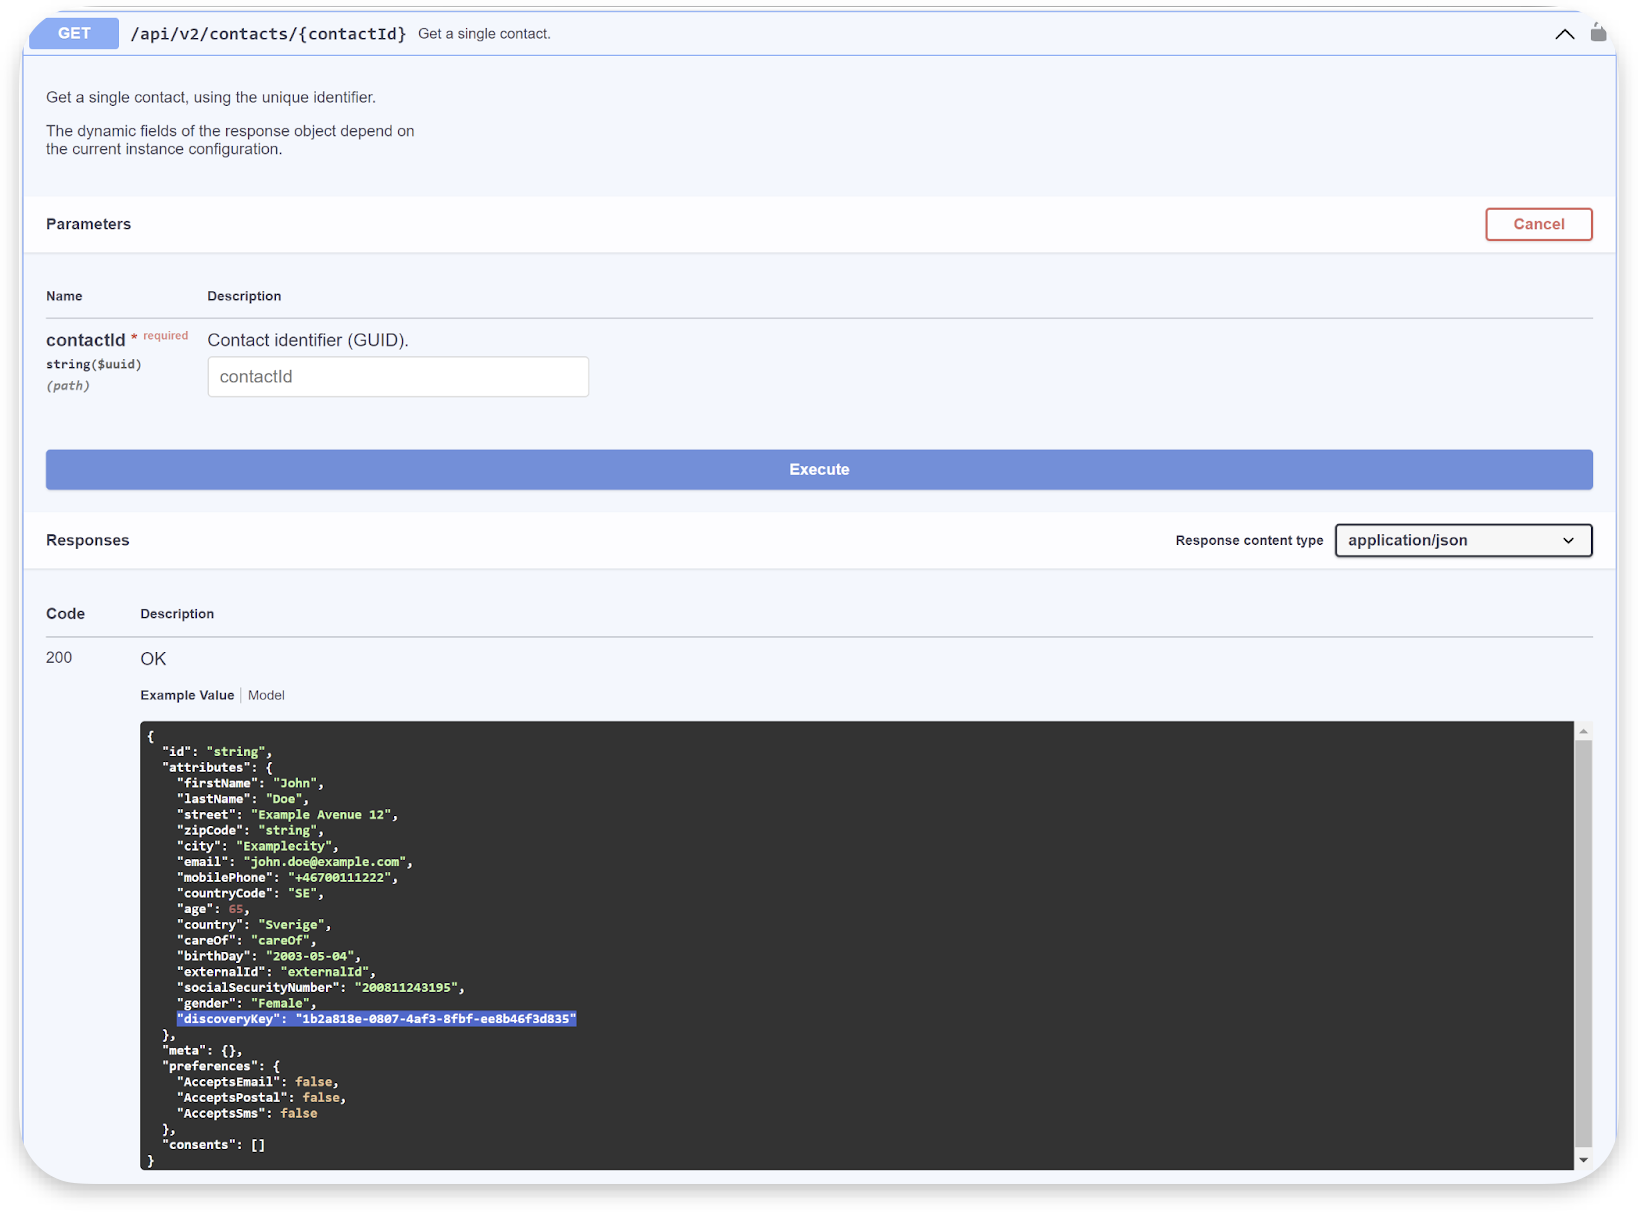
Verify by API
Verification can be done by API requests. The following endpoints includediscoveryKey in the response:
Verify end-to-end
This is a simple way to test thediscoveryKey implementation end-to-end.
- Go to the contact card in Engage for your user. Note that the “Discovery key” field is empty.
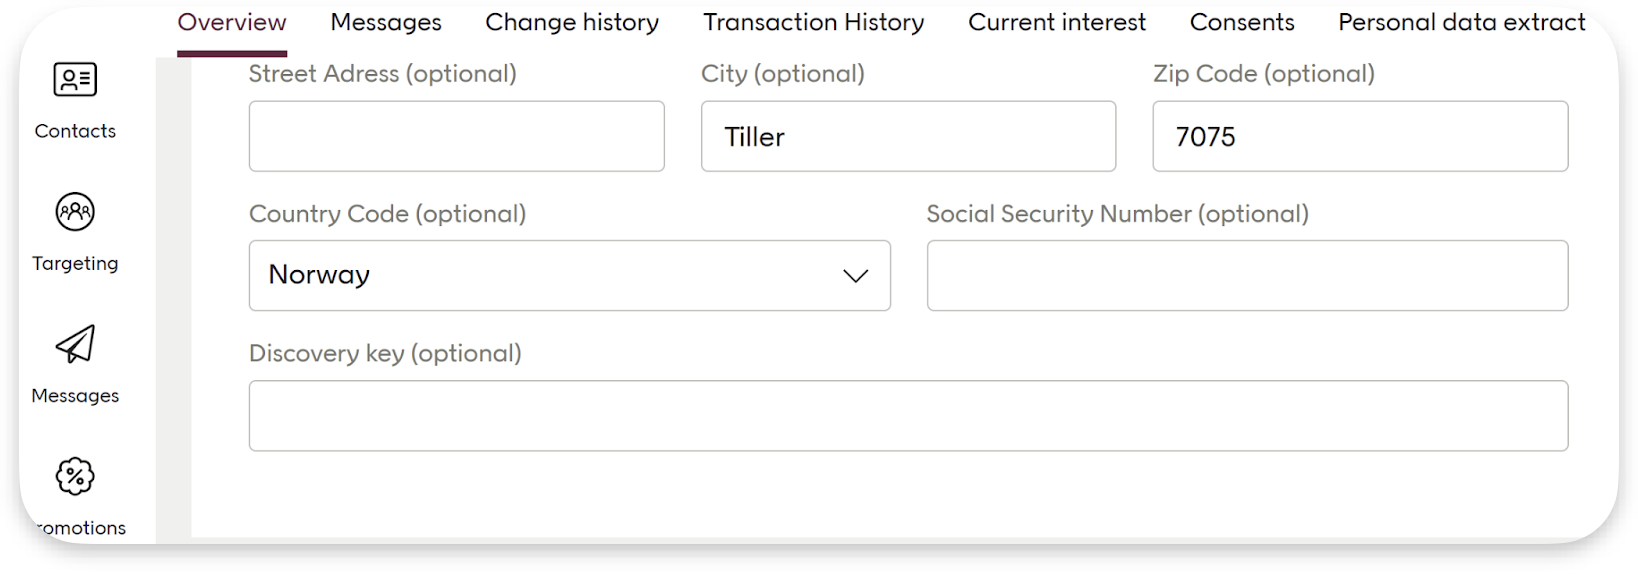
- Go to the storefront of the retailer
- Identify yourself on the site, either by signing in or creating an account. If possible, take note of the
customerKeyor ID if that is stored for a contact in the e-com/back-end system. This may be needed for future reference or troubleshooting. - Now back to the Engage tenant. Confirm that the
discoveryKeyhas been applied to the contact by checking the field in the contact card. If you have noted thecustomerKeyor ID in step 3, verify that it matches.
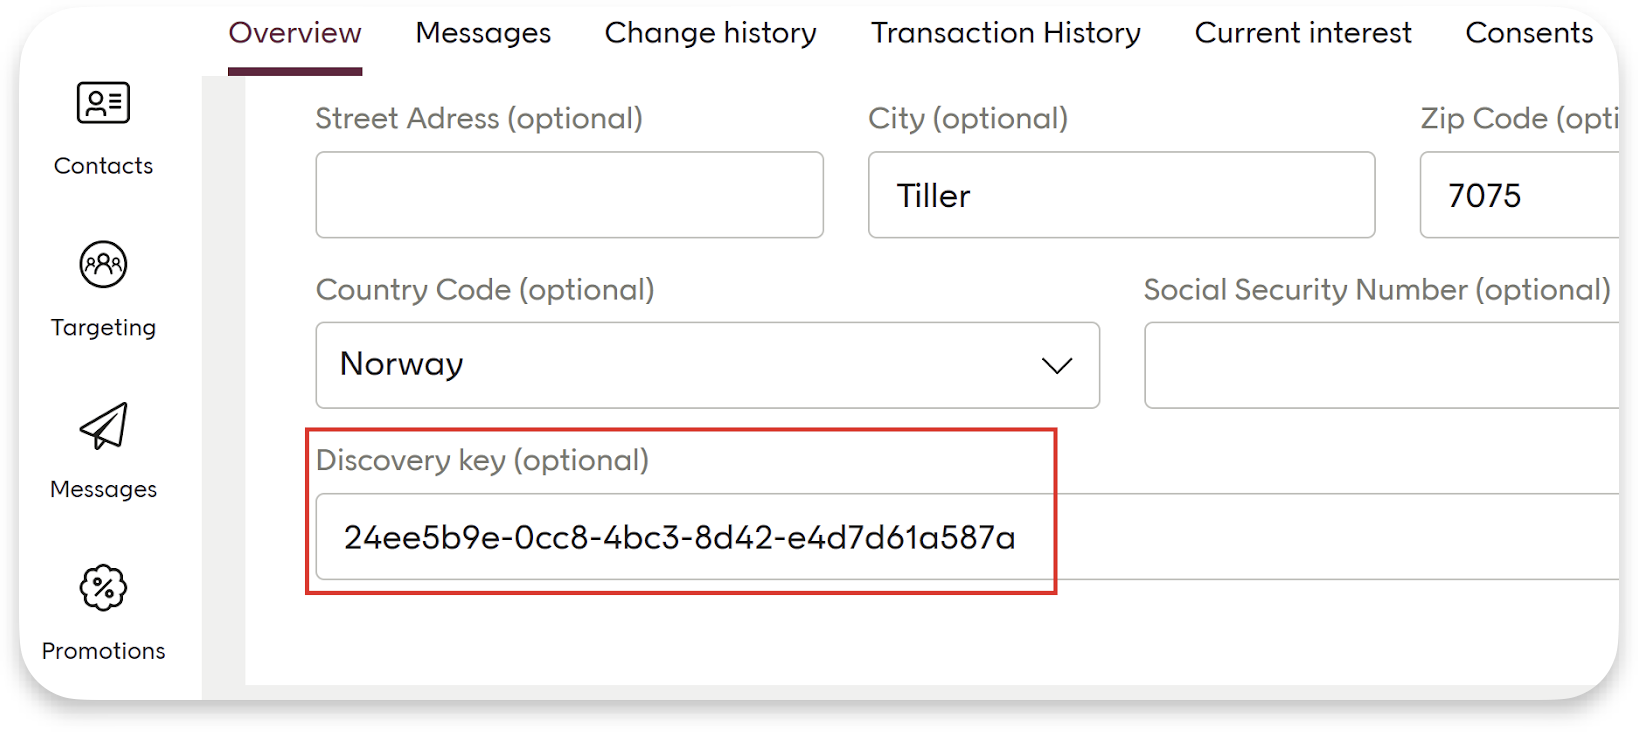
- This is an optional step you can do if the e-com/website creates a pre-membership account during newsletter sign-up. You can verify if the
discoveryKeyhas been assigned to the pre-membership contact in the Engage tenant by signing up for a newsletter and checking thediscoveryKeyof the newly created contact in the Engage tenant.
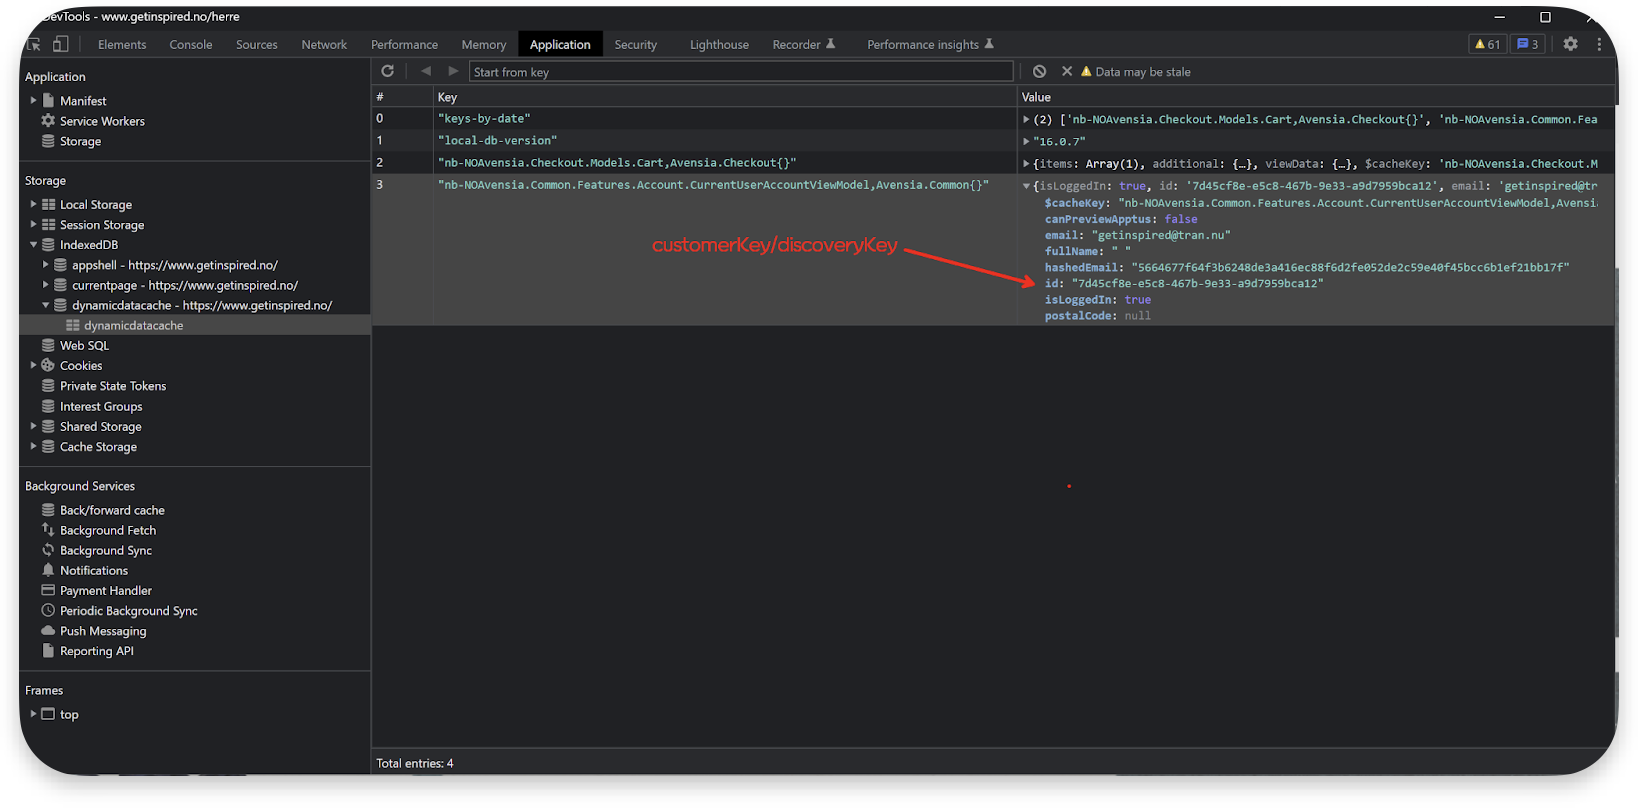
Verify in dev tools
Sometimes it is possible to verify that the ElevatecustomerKey matches the discoveryKey in the Engage contact card by using the browser’s developer console. Here you can analyze network communication and browser storage for clues to confirm the match between the customerKey and discoveryKey.
This ensures that the correct user data is being used for current interests.
Handling duplicate discoverKey values
All contacts in Engage must have unique adiscoveryKey value. If a discoveryKey is not unique, this can block contact creation and prevent personalization from working correctly.
When a validation error occurs
AdiscoveryKey validation error means that the discoveryKey you tried to save already exists in Engage. New or updated contacts are validated when added through the Contact API v2/v3. Other interfaces for creating or updating contacts, such as bulk endpoints, are not affected by this validation.
In this case, an error will be returned:
Error when discoveryKey is already in use
discoveryKey values to visitors. This can sometimes be related to how your site generates and stores identifiers, including through connection with integrations (for example, to Voyado Elevate).
Resolving the issue
Your site must always assign visitors a new, uniquediscoveryKey. Once generated, this new discoveryKey must be used in:
- Contact API requests
- The visitor’s cookie
- Any other system where
discoveryKeyis stored (such as databases, Engage, Elevate)
Cleaning up duplicates
Before cleaning up existing duplicates:- Make sure no new duplicates are being added.
- Confirm that the normal flows for adding and updating contacts work correctly (without disabling validation)
When e-com / 3rd party system is the master
When e-com / 3rd party system is the master
If your e-commerce platform or another system is the master of
discoveryKey, duplicates must be resolved there first. Once corrected, you will then send the updated discoveryKey values to Engage.When Engage is the master
When Engage is the master
If Engage is the master of
discoveryKey, duplicates can be removed directly within Engage. Contact Voyado Support for assistance with this process.Updating duplicates instead of removing them
Updating duplicates instead of removing them
If you prefer to update duplicate records rather than remove them, the master system must:
- Identify which contacts to update.
- Send the changes to Engage (via API or integration).