Setup and configuration
Here's how you set up the Voyado Engage app in your Shopify store.
Installation
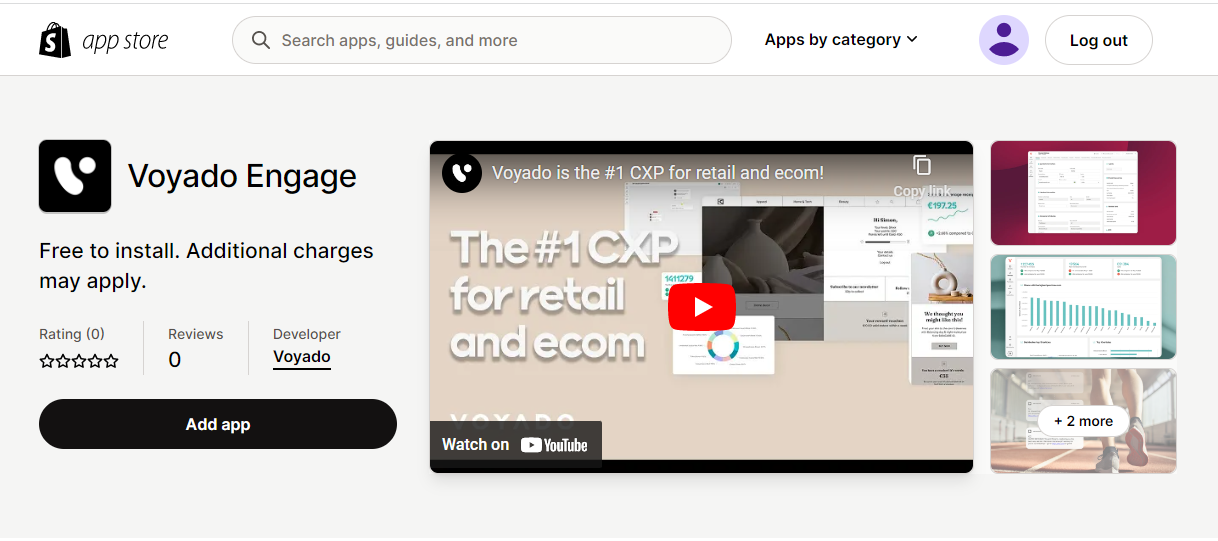
In the Shopify App Store, search for the "Voyado Engage "app. Select "Add app" to install it.
When the app is installed you'll be asked to connect it to your Voyado Engage account.
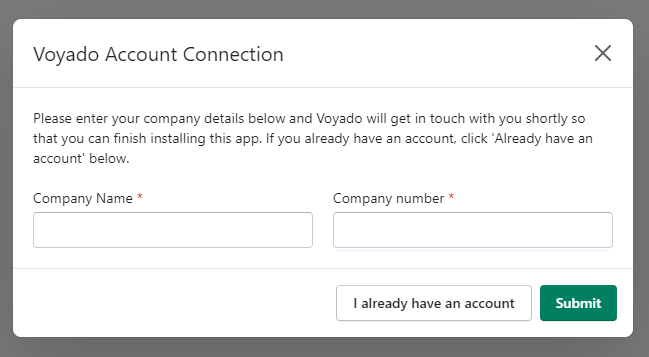
If you already have an Engage account, some configuration might need to be done so that it work with the Shopify app. Your Voyado team will take care of this for you. If you haven't already, now is the time to get in touch with them.
If you DON'T have a Voyado Engage account, fill in your company name and phone number and select "Submit". You will be instructed to wait for a Voyado representative to get in touch about setting up your Engage account.
Note
You will need an Engage account configured for Shopify before continuing with the setup.
Once you're sure your Engage account is set up to work with Shopify, select "I already have an account" to proceed to the first step in the "Setting up" section below.
Accessing this setup flow again
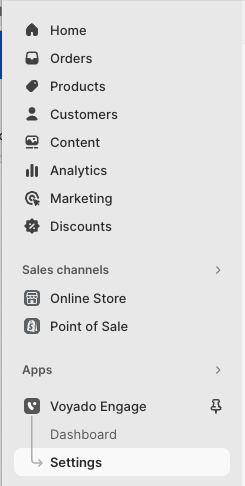
If you have to pause during the following setup, or just want to return to the settings after your setup is done, you can always access the configuration by selecting "Settings" for the app in your Shopify store, as in the image.
Setting up
Now that your Engage account is configured, you can proceed with setting up the app.
Engage account Connection
The first step is to input the base URL and API key for your Engage account.
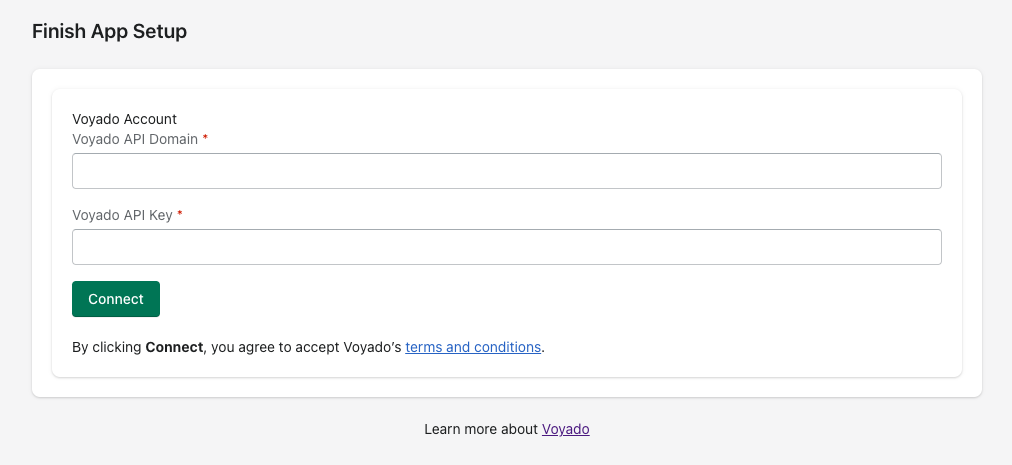
The base URL uses your Engage tenant name, which is the unique name connected to your Engage account. For example, if your tenant name is "example" then your base URL would be:
https://example.voyado.com
If you are connecting an Engage staging environment, you would use:
https://example.staging.voyado.com
Whatever your URL is, it goes into the first field.
The API key is used for secure communication between Engage and the app. You can generate API keys yourself in the Configure Engage section of your Engage environment. Go here to see how that's done.
API keys will look something like this:
1111fff1-4dc6-4a00-a5ce-e060c42f2222
Once the key entered in the second field, select "Connect". The app will test the connection to Engage.
If that connection is successful, the panel will then look like this:

You can now continue to the next step.
Changing connection
If you need to change the Engage environment you are connected to, you can return to this panel at any time and hit "Disconnect". This returns you to the panel at the beginning of this section, where you can enter your new base URL and API key.
Important
All the settings you've configured in the Shopify app will still be there if you choose to reconnect.
Alert settings
The task monitoring service tracks your app’s health, showing you if the syncing of data between Shopify and Voyado Engage is running successfully or not. You can access the task monitoring service under Task overview on the left-hand menu in your Shopify store, in the settings for your Voyado Engage app.
In this section of the configuration, you'll specify how the task monitoring service will run.
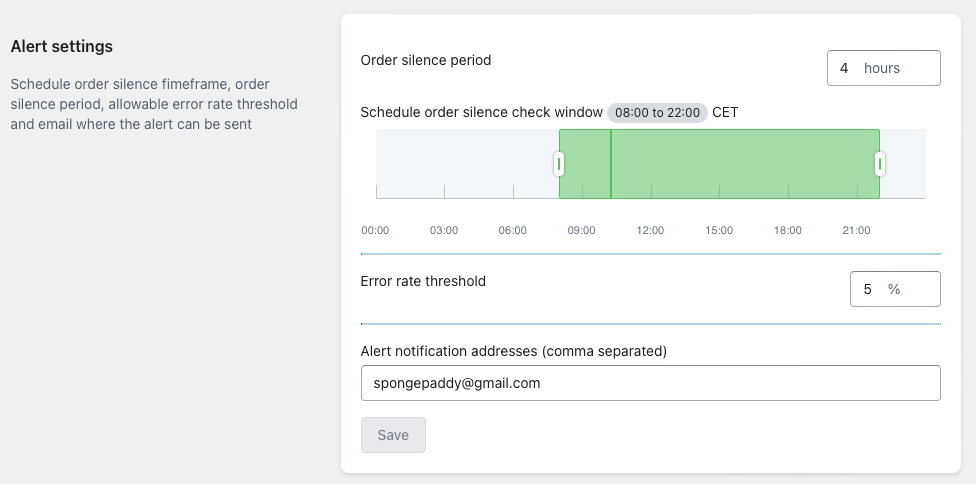
Order silence period: If this amount of time passes and no orders are successfully synced between the app and Engage, the system will raise an alert. This can be used as an indication that something has gone wrong.
Scheduled order silence check window: Here you can specify the daily time window during which order silences will trigger an alert. Useful if, for example, you know that you never get any orders during the night.
Error rate threshold: The percentage of errors out of the total that will trigger an alert.
Alert notification addresses: Here you input the additional email addresses that you want to receive any alerts. Note that the email address connected to your Shopify store will always receive these alerts.
Once everything is entered to your liking, press "Save".
You can find a more detailed description of the task monitoring service here.
Store to Country Mapping
Each one of your customers in Shopify have a country to which they “belong“, which depends on the store front or market they signed up with or placed their first order from.
In this step, you'll tell the Engage app for Shopify which country each of your e-com stores maps to (ships from).

Select "Add mapping" to start connecting your Engage stores to a country (in this image, some mapping has already been done).
Now select the first option, "Shipping country". You won't be using the "Shopify POS location" option here.
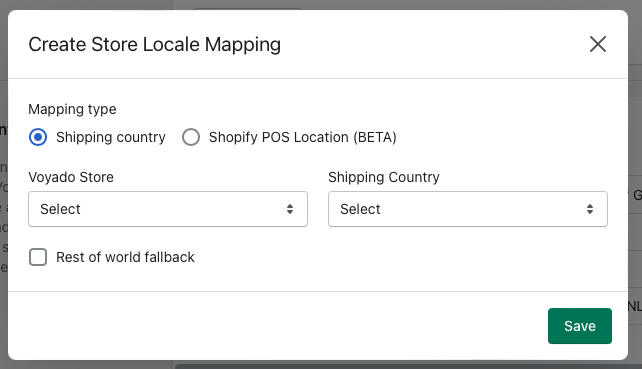
You will see two drop-downs. The first has your Voyado Engage stores, the second the shipping countries.
Note
Only Engage stores of type "ECOMM" will appear in the list of stores.
Select the country / locale for each of your Engage stores. A Rest of the world fallback value must be set for countries not specifically mapped and for customers without a location in Shopify that can be synchronized.
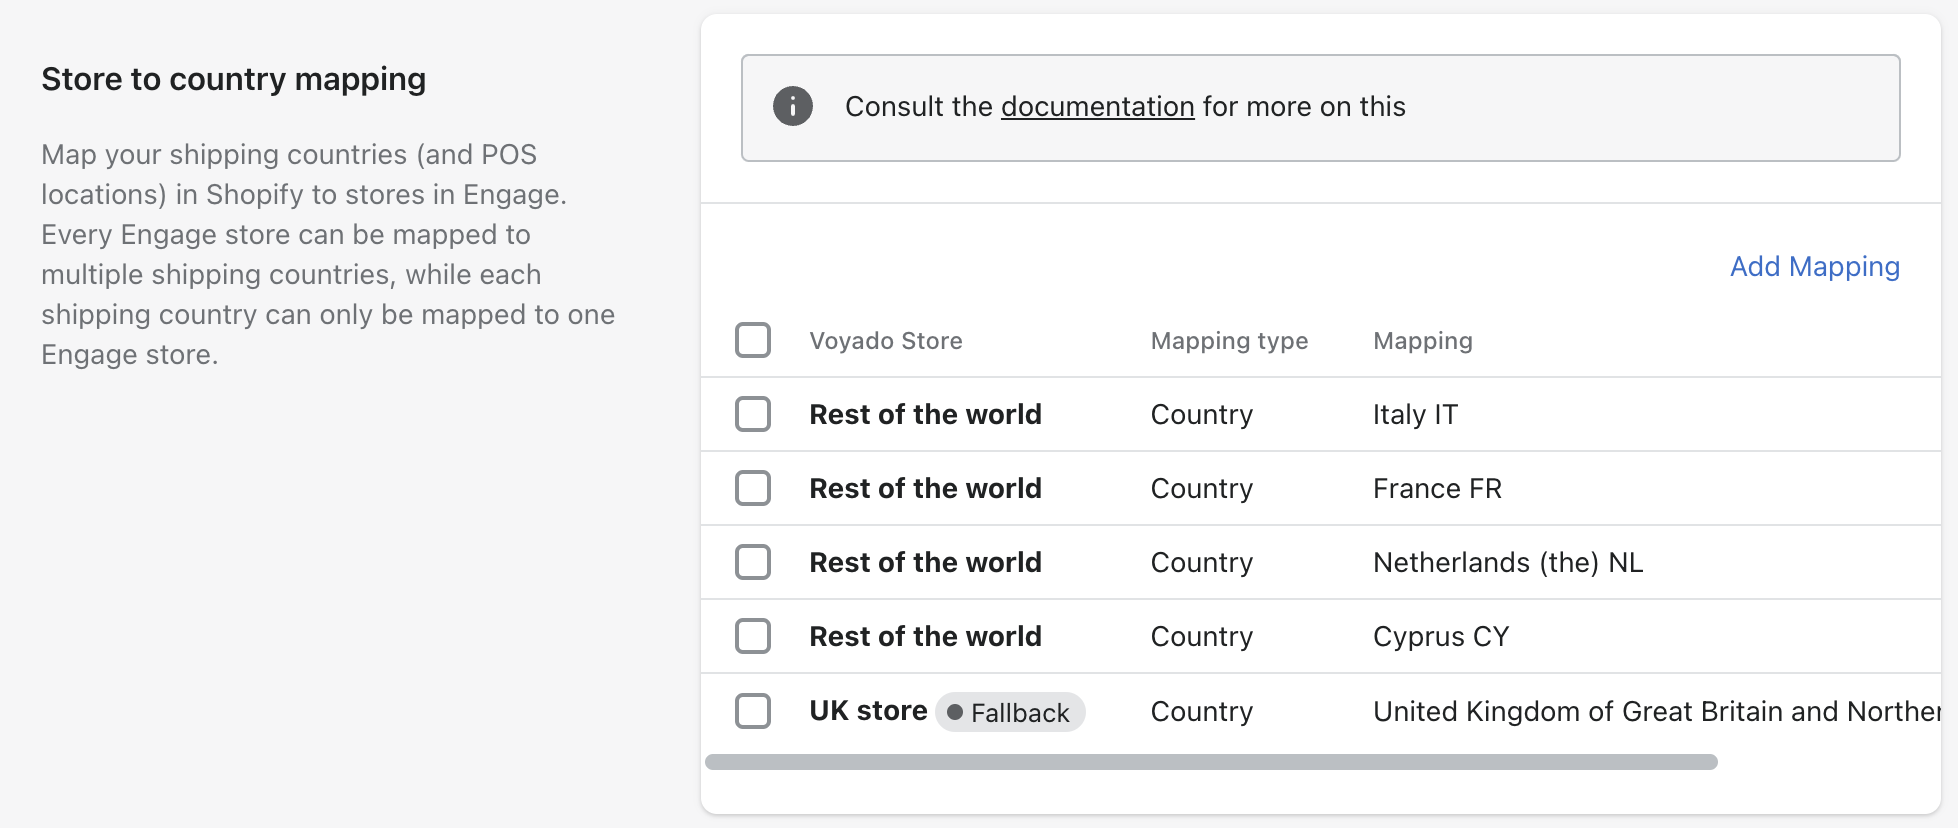
Add all the stores you want to use and select "Save". The panel will then look something like this:
Customer identification method
Here you choose which personal identifier to use when looking up customers in Engage.

Identify by email only (recommended): Search for customers using only email and nothing else. Voyado recommends this method.
Email first, then phone number: Search using first email and, if a match is not found, then by mobile phone number.
Phone number first, then email: Search using first mobile phone number and, if a match is not found, then by email.
Caution
If you choose to search by email first and then phone number (the second option on the list) there is a risk of multiple matches that could result in a validation error. This is because email is always unique in Engage but phone number is not required to be, and it's possible that several contacts could have given the same number. So keep this in mind.
Customer Contact Type
The app deals with two customer types: Member (account holders) and Contact (guest customers). The type Member is always used, and here you'll decide if you want to also use type Contact or not.
Both Contact and Member: This allows both contact types Contact and Member to be used.
Create everyone as Member: This means that all customers will be of contact type Member (recommended).

Important
Important update: Due to Shopify’s New Customer Accounts, all customers are now treated as account holders and the hasAccount field is no longer available. If you select “Both member and contact” above, all customers will be created as Contacts. To ensure all are treated as Members, choose “Create everyone as member” in the configuration panel above.
Receipt sync stage
Here you select the point at which an order will be stored as a receipt in Engage. This will either be at the order confirmation stage or when the order has actually been fulfilled.
Note
You can only use an order in an Engage segmentation after it has been stored as a receipt.

Order notifications
Enabling this setting will allow transactional communication to be sent from Engage.

These transactional emails can be either:
Order confirmation
Order fulfilled
Order partially fulfilled
Order cancelled
Order refunded
Note
You need to set up your marketing automations and email templates in Engage before sending these notifications. You'll also need to disable these emails being sent from Shopify to prevent sending out duplicates. Do this under Settings and then Notifications in Shopify.
Caution
Disabling these emails is only available to Shopify Plus merchants. Transactional emails sent from Shopify can't be disabled in regular Shopify accounts.
Caution
The "Order confirmation" Shopify transactional email can't be disabled in Shopify Plus admin, but only by the Shopify team themselves.
Inventory sync for back-in-stock notifications
If you want to use back-in-stock notifications in Engage, you'll need to enable this option.
A back-in-stock theme element is available in the theme editor. This can be added to your product template, allowing customers to subscribe for back-in-stock notifications in the e-com. With inventory sync enabled, you'll then be able to act on these subscriptions in Engage when something comes back in stock.
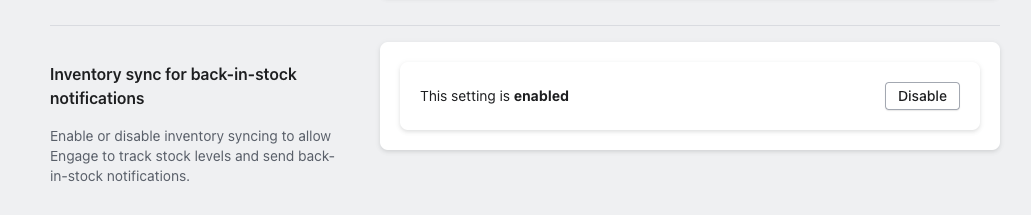
See here for detailed instructions on how to work with the app's back-in-stock functionality.
Group currency
The group currency is set up in your Engage environment. You'll need to write in the same value here. Doing this will convert and store the monetary values in all orders using the correct conversion rate.

Group currency names follow the ISO 4217 standard.
Caution
Be sure you enter the exact same group currency value as you have in your Engage environment.
Promotions & Loyalty app theme block
Important
This app theme block can only be used with Shopify classic customer accounts. It is not applicable for new customer accounts.
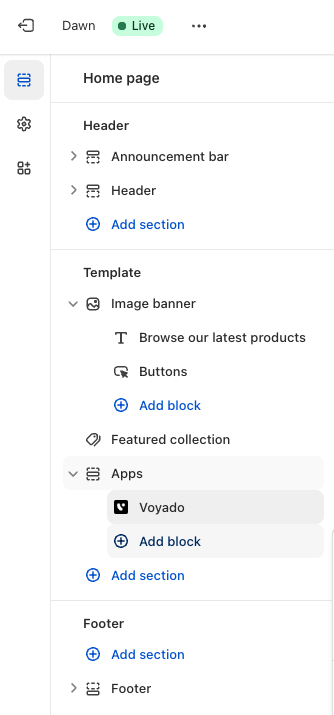
Shopify has a Voyado Engage app block which you can embed into your Shopify theme. By selecting “Customize theme” in the panel, you will be taken to the editor for your current theme.
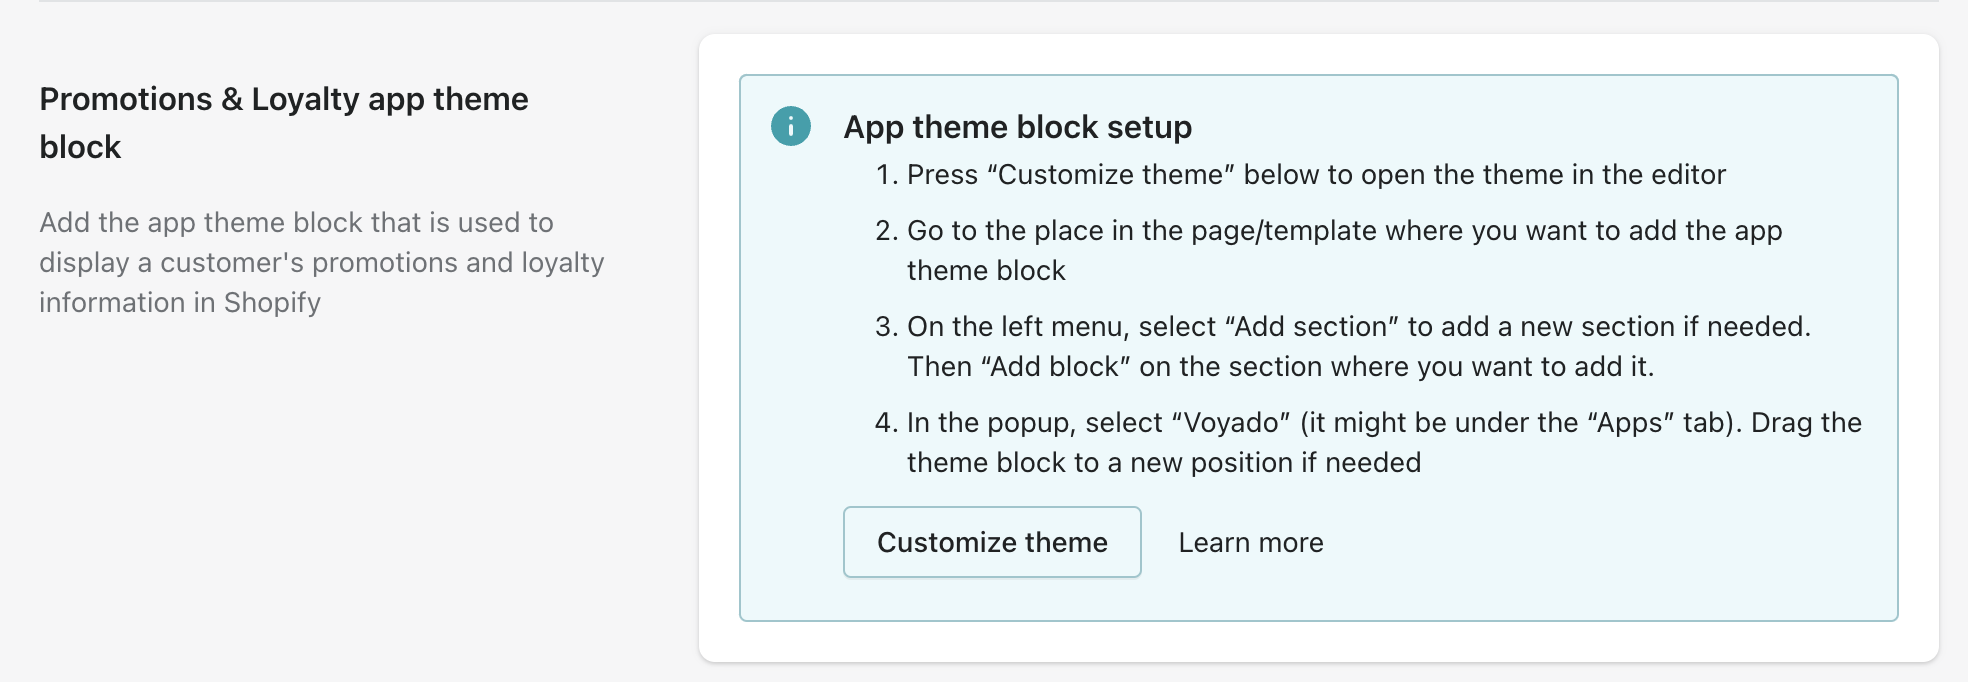
Here, using the side menu, you can embed the Voyado Engage app block in all pages (apart from the checkout page).
Under Template, select "Add Section".
Go to the "Apps" tab and select Voyado as seen in the image.
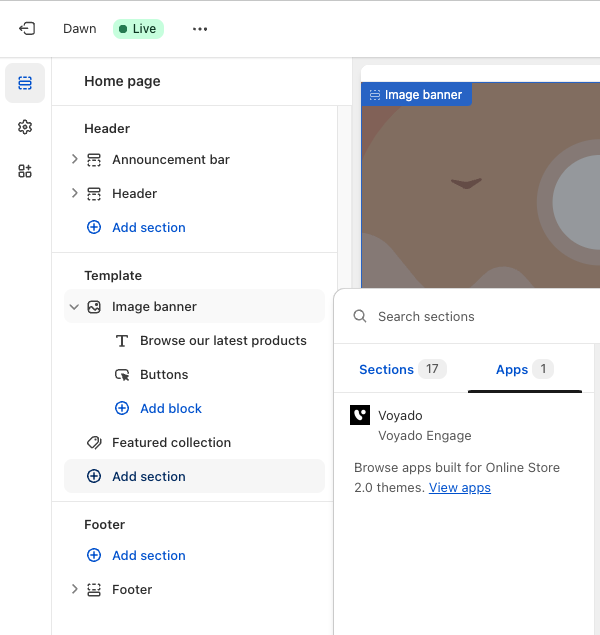
Now the Voyado app block appears.
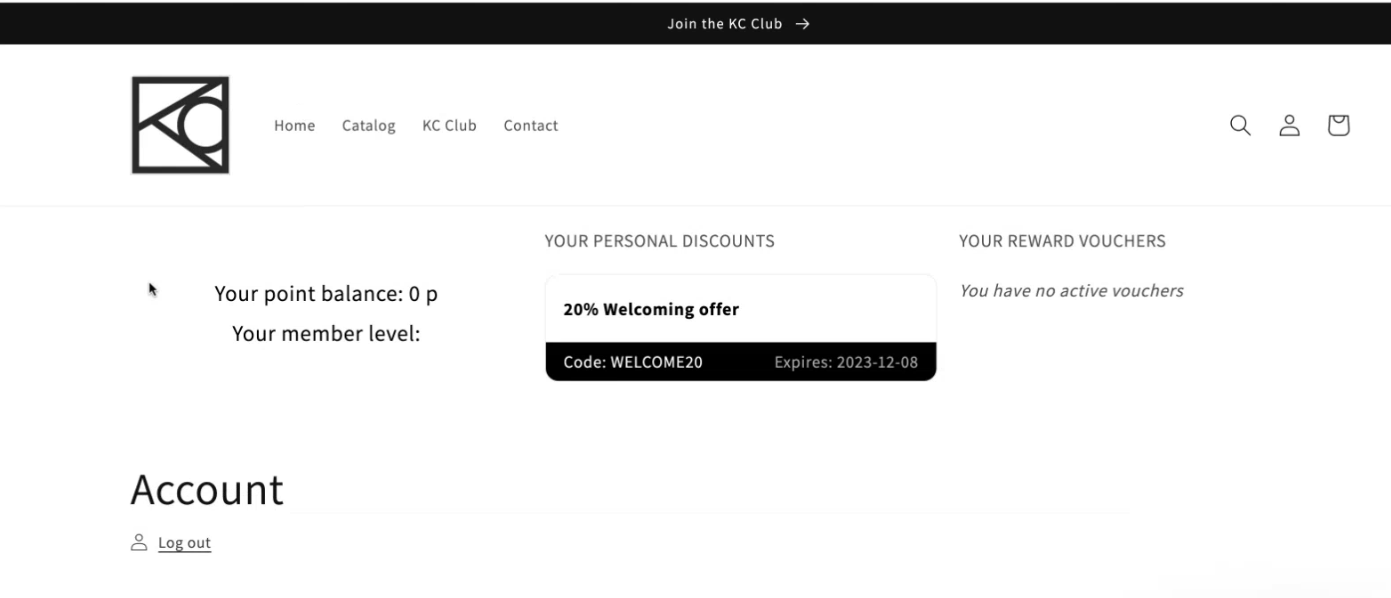
This app blocks can fetch loyalty data from Engage and display it, after the customer has identified themselves on-site either by logging in or by soft identification (see the following section).
Important information
The Promotions & Loyalty app theme block is only supported for pages and themes that support app blocks. Customer account templates can however be upgraded to allow app block support.
Shopify themes are not strictly versioned into OS 1.0 and OS 2.0. Instead, OS 2.0 themes are just those that use some of the newer Online Store features. Any older theme can be retrofitted to make use of OS 2.0 features like theme blocks, JSON templates, or advanced storefront filtering. So app embed blocks can be made to work on all themes regardless of version.
To allow the Promotions & Loyalty app theme block, you can upgrade only the relevant template (for example "customers/account") to use the OS 2.0 JSON template structure, allowing app blocks to be supported.
For the more technical, this is straightforward to do for a couple of templates. Follow the tutorial here.
Soft identification embed block
Soft identification (also called Soft ID) allows a customer to be identified in a Shopify store when they arrive there via a personalised link, for example from an Engage email send-out. To activate this tracking, select "View app embed" in this panel.
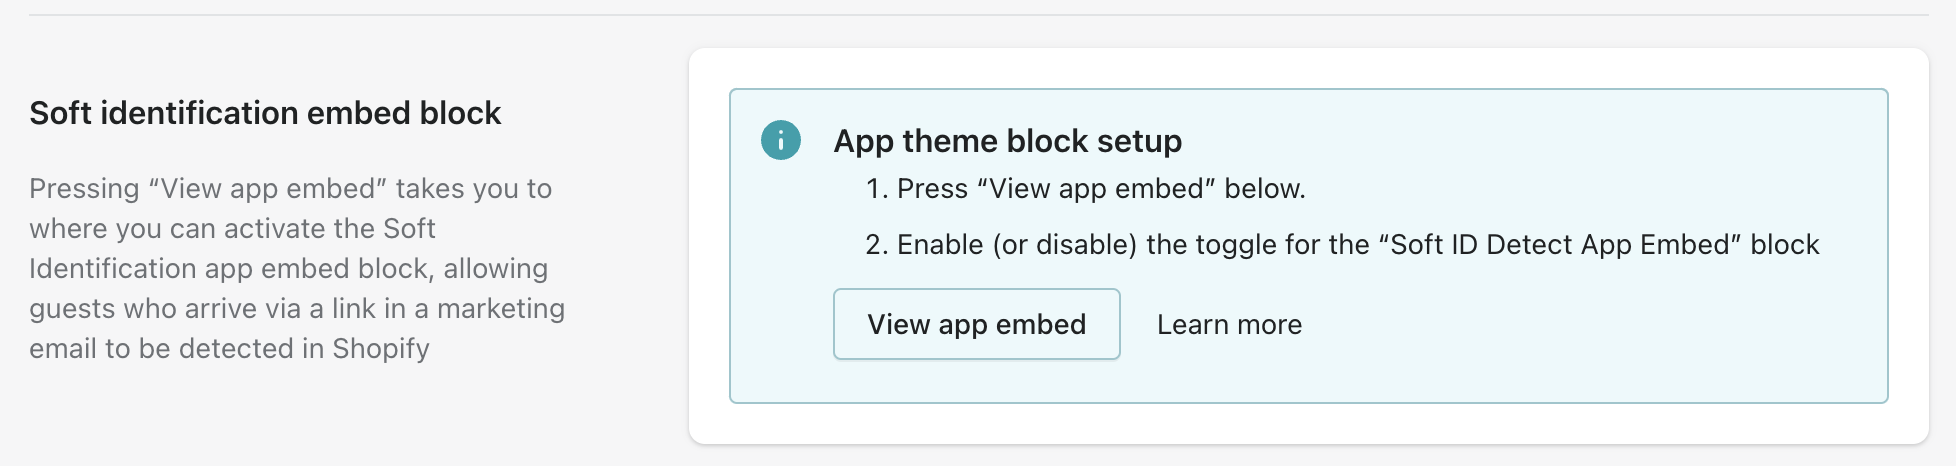
This will take you to a new page in Shopify, where you'll see this:

Enable the “Soft ID Detect App Embed” toggle. Be sure to select "Save" in the top right of the page.
Important
You must activate this toggle to be able to be able to use tracking.
You'll need to also insert the decrypt key, which happens in the next step below.
Once these two things are done, your app block with be filled out with loyalty data upon customer identification.
Soft identification decrypt key
For tracking to work, you'll need to input and save the encryption key. Copy the "Encryption key" from the Configure Engage > Soft identification section of your Engage environment.
Then go to the "Soft identification decrypt key" area of the Shopify app configuration and enter the soft identification decrypt key for your production environment. Don't forget to press "Save".

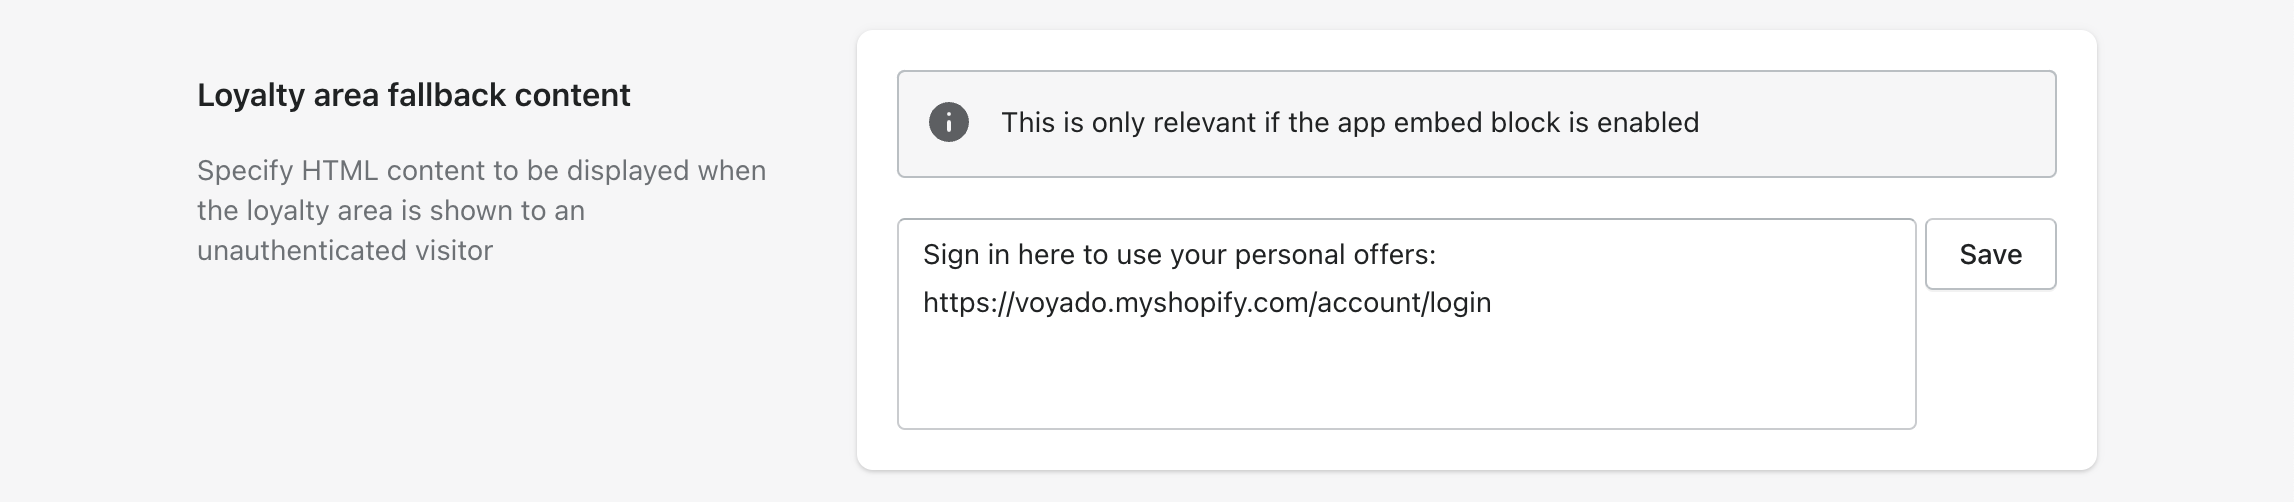
Loyalty area fallback content
In this section you can add fallback content to the app block if the customer has been identified through an email link but hasn’t signed in yet. This will allow you to prompt the customer to sign in, allowing them to use their personal discounts and redeem them in Engage.
Web pixel tracking
Web pixel tracking allows the app to track user behavior, enabling many useful functions.
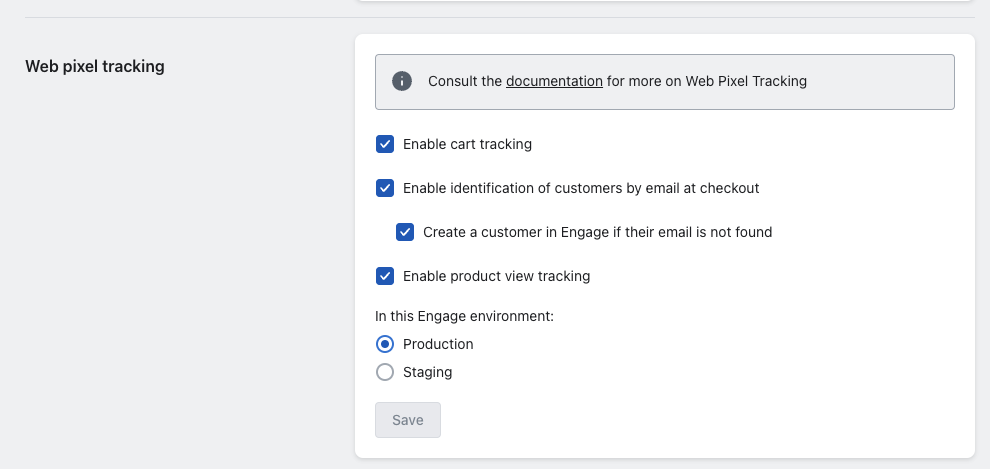
"Enable cart tracking" allows you to track cart activity on-site and trigger abandoned cart email through Engage.
"Enable identification of customers by email at checkout" enables a look-up of customers in Engage when they give their email address at the POS. By also selecting "Create a customer in Engage if their email is not found" you allow that customer to be created in Engage if the email they gave is not found there.
"Enable product view tracking" lets you track what your customers are viewing and send it to Engage. Abandoned browse is also supported.
The choice of "Production" or "Staging" here depends on your Engage environment. If the word "staging" appears in your base URL (see Account Connection above) then choose Staging here. Otherwise, choose Production.
Select "Save" and this step is completed.
Important
Remember to activate the “Soft ID Detect App Embed” toggle in the "Soft identification embed block" section, otherwise web pixel tracking will not work.
Read more about the "Enable identification of customers by email at checkout" feature on this page.
Promotions & reward voucher sync
If you plan to use promotions or vouchers across Engage and Shopify, you'll need to activate that here. Both promotions and vouchers from Engage are handled as different kinds of discounts in Shopify.
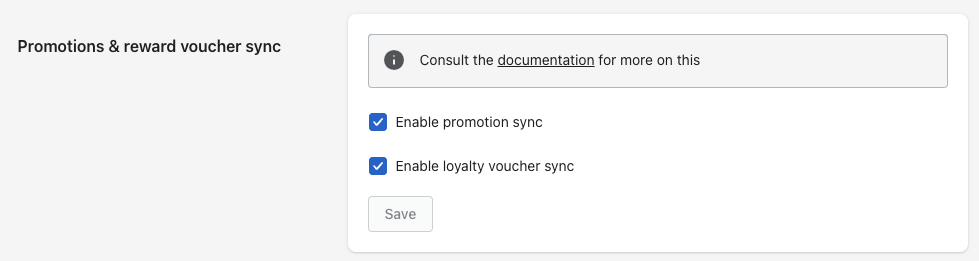
"Enable promotion sync" allows you to use promotions between Engage and Shopify. Promotions need to be first created as a discount in Shopify, then as a multichannel promotion in Engage, using the same unique ID as the Shopify discount to link them. The promotion is then displayed in the loyalty app block in Shopify and redeemed back to Engage when used.
"Enable loyalty voucher sync" allows vouchers to be created in Engage, synced across to Shopify, displayed and used there, and then redeemed back to Engage when they are used.
For a more detailed look at how promotions and vouchers are set up and used, read this section.
Data import
This allows you to migrate customers and orders from your Shopify account to Engage through the Voyado Engage app, enabling you to start your Engage journey with your data already in place.
If you have the Shopify POS integration with Engage, this step will migrate that data as well.
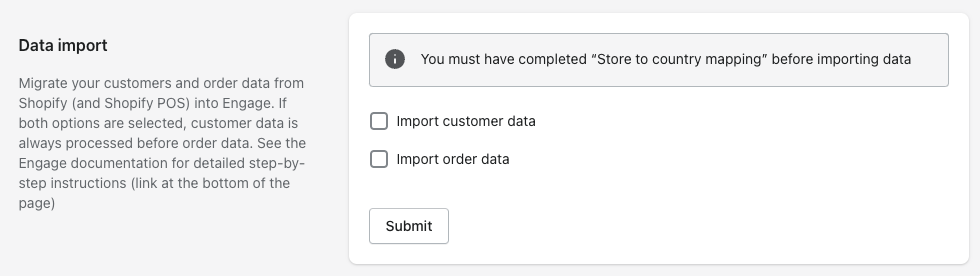
There are two cases to consider here:
Case 1 - Migrating customers from Shopify to Engage
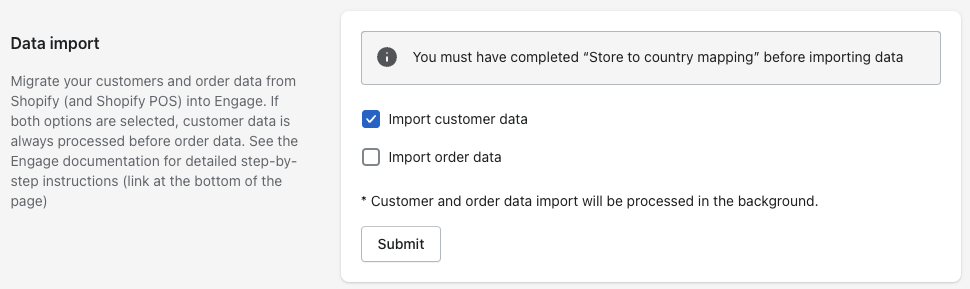
Here, you'll select the "Import customer data" options and then hit "Submit". This will migrate all your Shopify customers (and POS customers, if applicable) to Engage. If they don't already exist in Engage, they will be created there as contacts.
If a migrated customer already exists in Engage, the app will not update their data, but just fetch the contactId reference from Engage and store that in Shopify.
This app can also handle customers that were created only in Engage or imported there through other channel, such as a CSV file import, or via some other platform. This is important in the next step when migrating orders.
Important
"Import customer data" will fetch and store the contact ID of any customer who was created in Engage outside of the app.
Case 2 - Migrating orders from Shopify to Engage
This starts a migration of Shopify orders, both purchases and returns, to Engage (and POS orders, if applicable). For this to work, the customer who made the order must already exist as a contact in Engage. That's why you'll always select the "import customer data" option here. Doing this ensures that customer data is synced before orders data is migrated (as there always needs to be a customer to connect an order to).
If, for example, a customer exists in Engage but not in Shopify, the app, when matching orders to customers, will fetch the contactId reference from Engage and store it in Shopify. This is relevant for any customer data imported into Engage outside of the app.
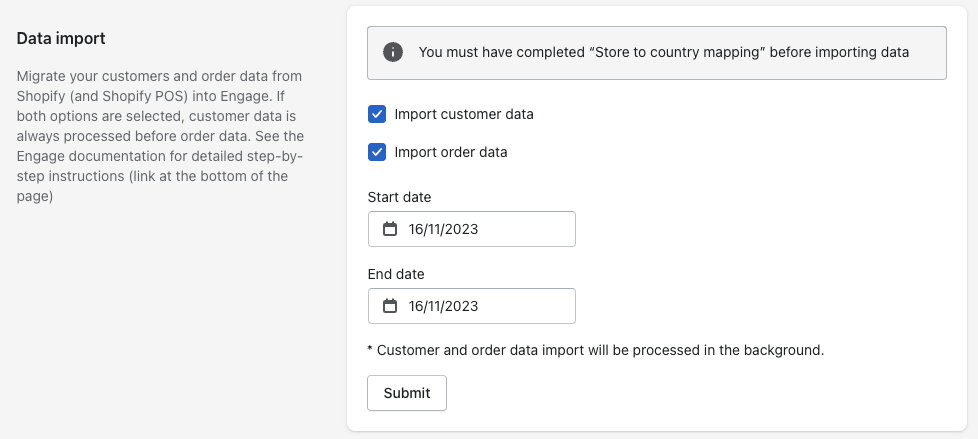
The order data option allows you to specify "Start date" and "End date". Then you will only sync those orders created inside that time window. Hit "Submit" to start the migration.
Note
When doing an order data migration, the app will process the data in this order: customer import first, and then the order import.
Warning
The migration of customers and orders can activate automations for those customers that exist in Engage. If you have automations set up to trigger on "New contact registered", "Product purchase" or "New return", you should deactivate these during this migration.
Headless API keys
Here you input the API key (or keys) to be used when running Shopify headless.
See here for detailed information on running headless Shopify with Engage.

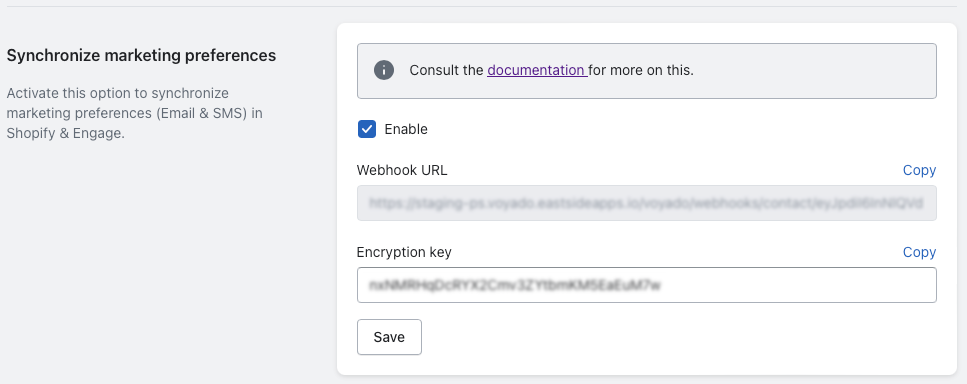
Synchronize marketing preferences
You can sync all preference updates made to contacts in Engage directly to Shopify using a webhook system. If you're doing this, this is where you add the encryption key and webhook URL to use. In this article you can read a full description of how webhooks are used with the Voyado Engage app.
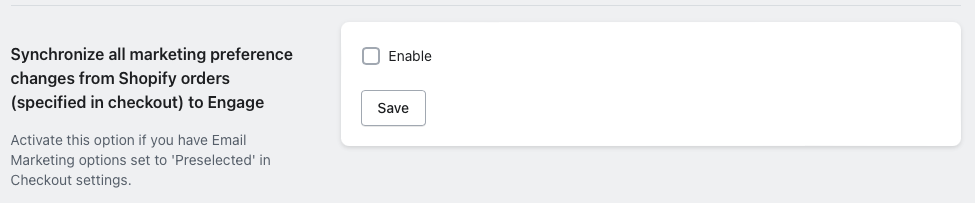
Synchronize all marketing preference changes from Shopify orders
Enabling this does not change any settings in Shopify. But if you have the "Email" option set to to “Preselected” in Settings > Checkout > Marketing options you'll need to enable this too.