Mapping stores to countries
To get Engage working with Shopify you'll need to map your Shopify markets to Engage stores.
About markets, countries and locales
In Shopify you can create markets for your store. Each market is a way to divide up your customers into useful segments in order to target specific countries or regions, or just to group countries and regions together to simplify your expansion efforts. For example, you create a market and call it "BeNeLux":
Market: BeNeLux:
Countries: Belgium, Netherlands, Luxembourg
Languages: French (fr), Dutch (nl), German (de)
If you have the language selector for your Shopify store, this means that customers in these countries can pick their language. Combining these countries and languages in all possible ways gives you a total of 3 x 3 = 9 locales (a locale being a combination of a language plus a country) for your "BeNeLux" market.
However, some of these combinations (nl-LU, fr-NL, de-NL) aren't in the standard so they can't be used.
Caution
Only locale names following the .NET standard (see here) can be used to configure product feeds in Engage.
This shows the process:
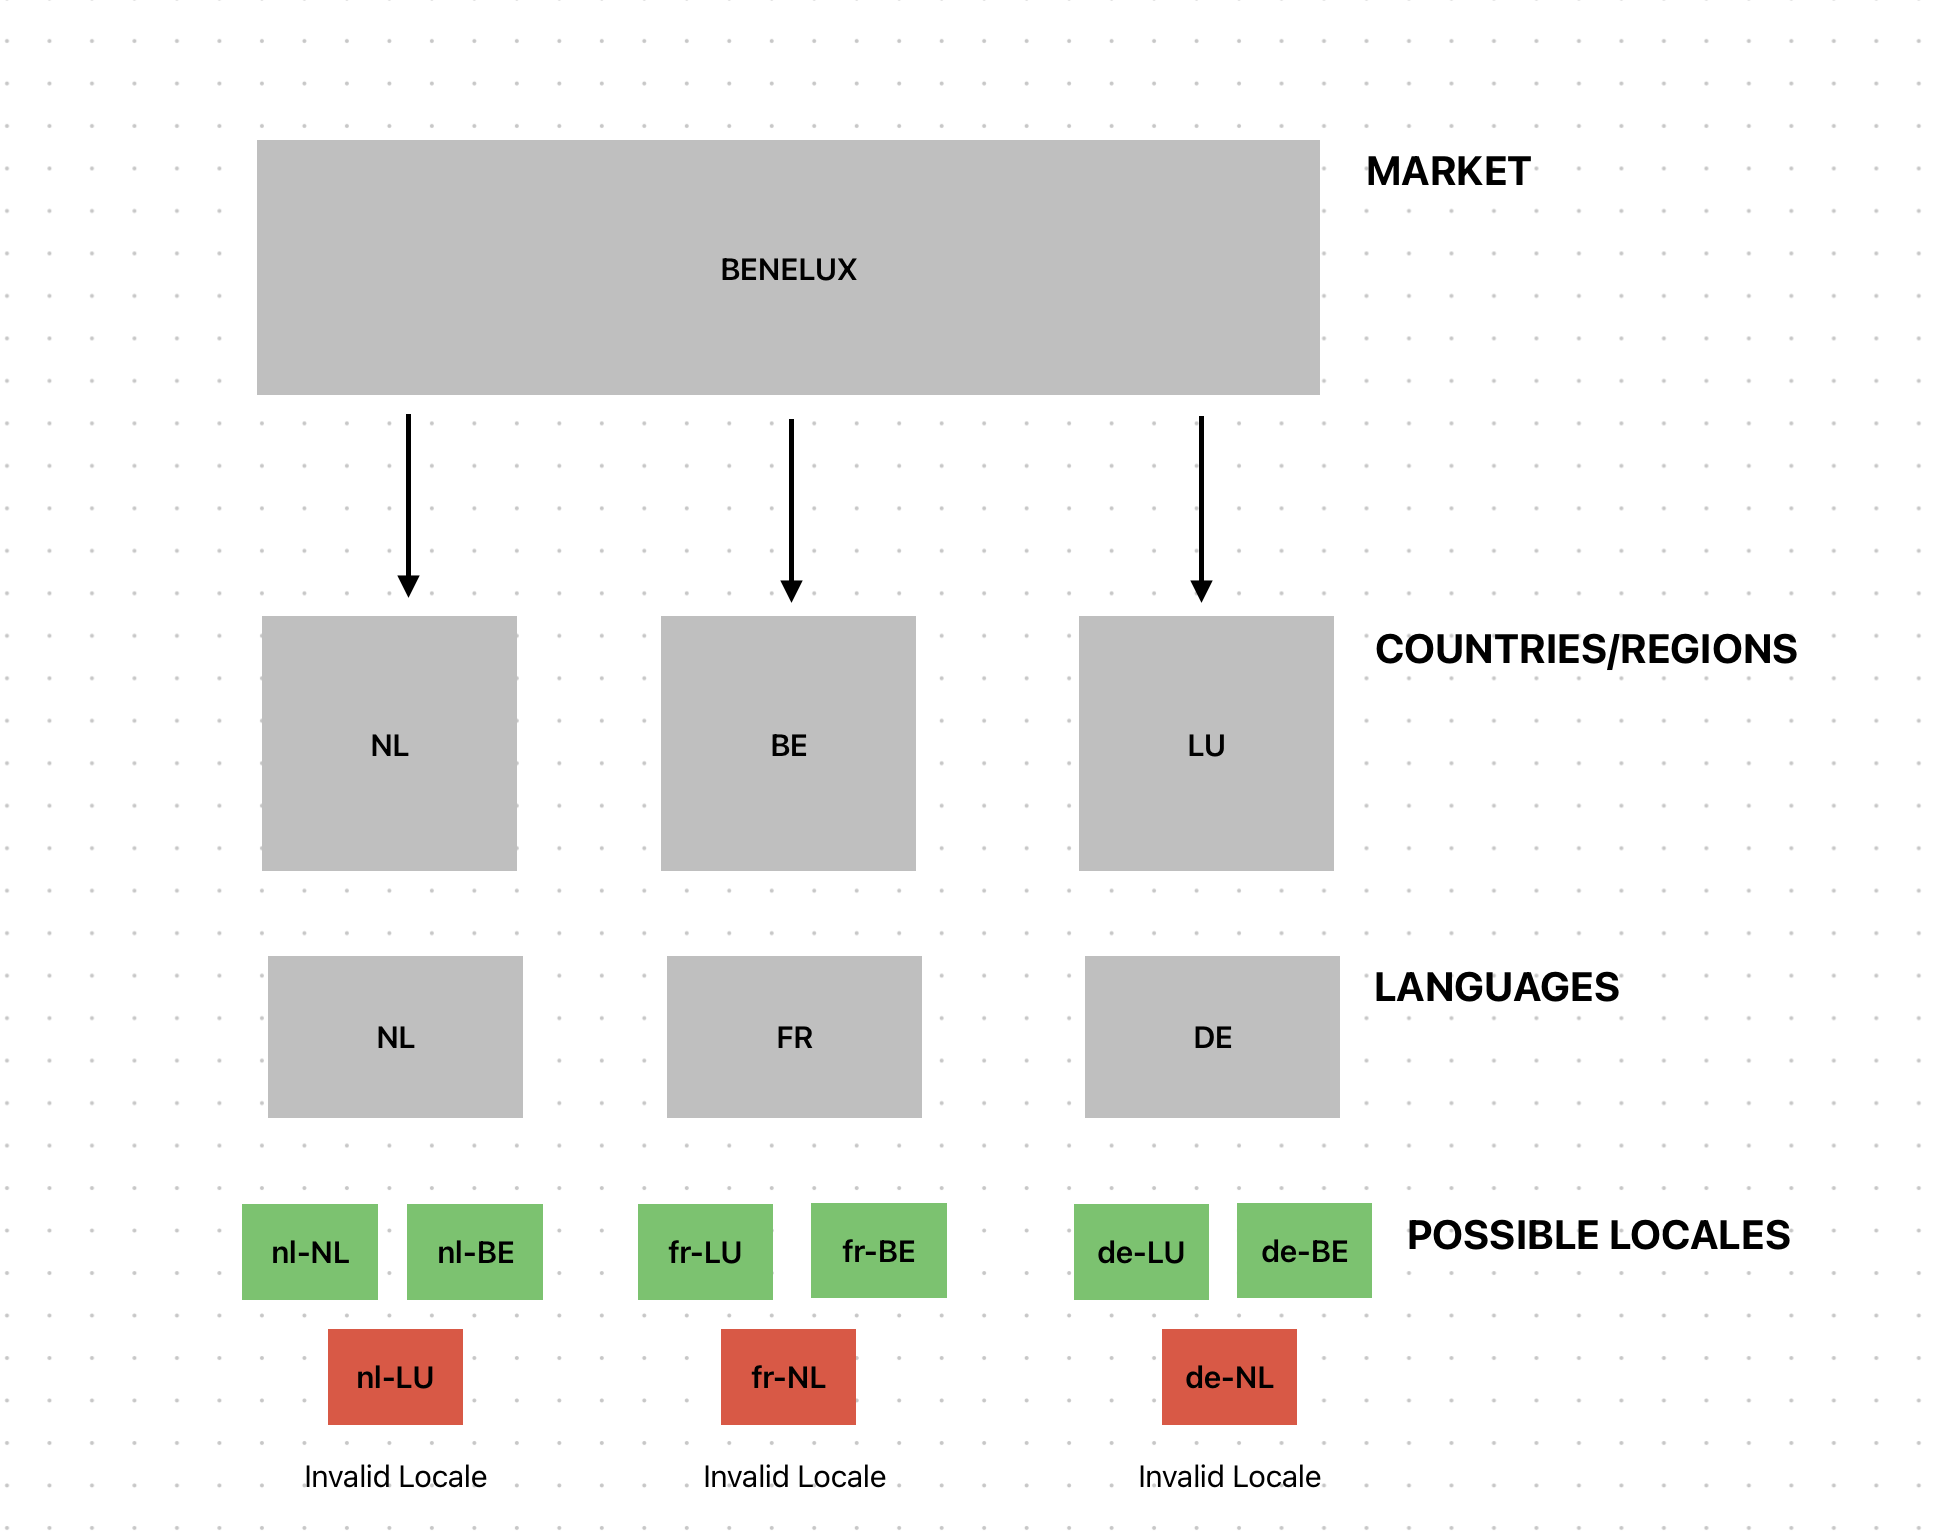
Removing the invalid locales leaves us with:
fr-BE
fr-LU
nl-BE
nl-NL
de-BE
de-LU
There needs to be a product feed configured for each of these locales in Engage. However, since product feed is defined by language, only three product feed URLs are actually needed, since we have three languages. So each product feed URL can be used in multiple locales when configuring them in Engage, as long as they use the same language. For example, nl-NL and nl-BE can both use the same product feed URL.
Note
If you don't have the language selector enabled for your e-com, the language used for a customer will just be the default one set up for their country.
In a nutshell, you'll have to send to your Voyado team the locales you will use, following the standard above. They will them use these to configure the required product feeds in Engage, for use in email send-outs etc.
With this in mind, below are two ways you can map your Engage store to a country location in Shopify.
The first, A, is for when you ship products to several countries within the same Shopify Store, using Shopify Markets.
The second, B, is where you have a separate Shopify store for each country you sell in.
A - One Shopify store for all the countries you ship to
Imagine that you are a Shopify user selling to three different countries: Sweden, Netherlands and the UK. You have these shipping countries collected within the same Shopify store. When setting up the Voyado Engage app in Shopify, follow the steps below.
First, you'll need to create the stores in Voyado Engage:
Log into Voyado Engage.
In the left-hand menu, select "Administration" and then "Stores".
In the top right corner, select “New store“.
Input your store's details, for example:
Store: “ecom SE“
Time zone: “(+02:00) Europe/Stockholm“
External Id: “ecom-se“
Store type: “eCommerce“
Active: "Yes"
Select “Save” in the top right corner.
You've created your Sweden store. Repeat step 3-5 for the Netherlands and the UK.
When all your stores have been created in Engage, you can start mapping them to your Shopify stores within the Voyado Engage app's configuration area.
Important
It's important to choose one of your stores to be “Rest of the world fallback“. Customers without a location country specified, or with a location country in Shopify that is not connected to a store in Engage, will be automatically connected to whatever Engage store is mapped as your “Rest of the world fallback“.
Note
Errors connected to store mapping can be seen on the “Dashboard“ page.
These are the steps to follow:
Log into your Shopify store and access the “Voyado Engage“ app.
Go to “Settings“ and the section “Voyado Store to Country Mapping“.
Select “Add Mapping“.
The mapping type should be “Shipping country“.
In the “Voyado Store” drop-down list, choose the store you want to start mapping. In our current example, it's the first of our three countries, Sweden, so choose the “ecom SE“ store.
In the “Shipping Country“ list to the right, choose the country “Sweden“.
Select “Save“ and the mapping should appear in the list.
Repeat steps 3-7 for the Netherlands and the UK.
B - A separate Shopify store for each country you ship to
Imagine again that you sell to three different countries: Sweden, Netherlands and the UK. You have a separate Shopify store for each country. When setting up the Voyado Engage app in Shopify, follow the steps below.
The first thing you have to do is create the stores in Voyado Engage:
Log into Voyado Engage.
In the left-hand menu, select "Administration" and then "Stores".
In the top right corner, select “New store“.
Input your store's details, for example:
Store: “ecom SE“
Time zone: “(+02:00) Europe/Stockholm“
External Id: “ecom-se“
Store type: “eCommerce“
Active: "Yes"
Select “Save” in the top right corner.
You've created your Sweden store. Now repeat step 3-5 for the Netherlands and the UK.
When all your stores have been created in Engage, you can start mapping them to your Shopify stores within the Voyado Engage app's configuration area.
Important
Customers without a location country specified or with a different location than the chosen “Shipping Country” will be connected to the Voyado store mapped as “Rest of the world fallback“. In the example above, the Shopify store will be mapped to the Engage store “ecom SE“.
Note
Errors connected to store mapping can be seen on the “Dashboard“ page.
Log into your Shopify store for Sweden and access the “Voyado Engage“ app.
Go to “Settings“ and the section “Voyado Store to Country Mapping“.
Select “Add Mapping“.
The mapping type should be “Shipping country“.
In the “Voyado Store” drop-down list, choose the store you want to map. In our current example, it's the first of our three countries, Sweden, so choose the “ecom SE“ store.
In the “Shipping Country“ list to the right, choose the country “Sweden“.
Tick the box “Rest of the world fallback“.
Select “Save“ and the mapping should appear in the list.
Now repeat steps 1-8 for the Shopify stores connected to the Netherlands to the the UK.